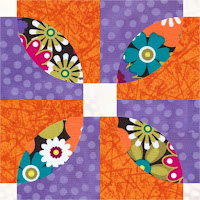
Today's block is a piece of cake compared to the previous blocks so far! It only has 20 pieces! It does involve curved piecing so, if you haven't done curves before, I did do a very crude Youtube video. It just takes some practice. These inside (or concave) curves do need to be clipped. See the photo in the step by step instructions. Click on the link to see it.
IDAHO BLOCK 2
Here are the fabrics I picked.
Here are the templates ready to use.
Patches are cut and ready to sew (oops forgot to take a photo). Here is what the block looks like.
CUTTING INSTRUCTIONS
Fabric 1 Symmetrical light
* Fussy cut four (4) like repeats with Template A.
Fabric 2 Pink
* Cut four (4) with Template B.
Fabric 3 Green
* Cut four (4) with Template B.
Fabric 4 Light
* Cut eight (8) with Template C.
PIECING INSTRUCTIONS
Step 1. Sew a Fabric 4 C patch to each end of two Fabric 2 and two Fabric 3 B patches. Press to Fabric 4 on one set (the fabric 2 set) and Fabric 3 on the other set.
Step 2. Clip the concave edge of all of the B patches. Clip a little less than 1/4" and about 3/8" apart.
Lay out the A patches and remaining B patches as shown. Make sure you keep the center of the fussy cut piece going in the correct direction.
Step 3. To match the centers of the B patch and A patch, fold one in half with wrong sides together and one with wrong sides together. Place creases together and pin with the concave piece on top. Pin the center and ends of the patches as shown. You can see I use a "weaving" effect when I pin to hold the edges together. Be sure to line up the 90 degree angle with the edge of the crescent shape. Sew slowly with a narrow stitch (2.0 or 1.9). Start with the needle down in the beginning, take a couple stitches and then remove first pin. Pull section to the left slightly and the two edges will start to line up. Keeping the edges together and a slight tug on the center of the patch to keep from getting a pleat, sew to the center pin. Stop with the needle down and pull slightly to the left again, lining up the edges. Sew slowly to the end with that slight tug and when the machine needle gets close to the pin that is pointing towards the needle, hold down the head of the pin and start sewing to the end. The pin will slowly come out as you are sewing. Use the pin at the end to make sure that your edge remains at 1/4" from the needle. Press towards Fabric 2 and Fabric 1 on the Fabric 3 section.
If you have never sewn curves, Craftsy is having a FREE weekend March 2-4. That means you can watch any video class free for the entire time. You can watch the videos in my class "Clever Curves" and if you really like it and decide to purchase it you can use this link to get it.
Step 4.
Lay out the sections from steps 1 and 3 as shown. Matching centers, seams, and ends, place the concave piece on top, pin and sew as in step 3. Make all four sections. Hold off pressing until you lay out the four sections together. Then press seams in opposite directions. Square off section if needed. They should equal 6-1/2" square. Square edges evenly, don't trim more off on one side than the other or the center squares will not match.
Step 5. Lay out the four sections as shown. Sew across each row, pressing one to the left and one to the right. Sew rows together. Press in one direction or twist center seam and press all in the same direction.
The finished block looks like this!
Here are the downloadable templates.
IDAHO BLOCK 2 TEMPLATES
As always: Do what you love and love what you do. Please feel free to share this with your quilting friends. Thanks for reading.


