
Whenever I start a new quilt or block I always do a test block first, before cutting out the fabric I plan to use with the actual quilt. There are a couple reasons why I do this. One is I want to make sure that I like where I put the fabrics. When I first started quilting (before the design programs were available) I just thought that the fabrics I picked would work out fine in the places where I had planned to put them. Well lesson learned, after I cut out all of the pieces for a quilt and I put a block together and realized I did not like the way the block looked! Even though now I use Electric Quilt to design my quilts, I do sometimes change the way I arranged the fabrics.
Another reason is I like to check my pressing directions as I am making it so when I write the instructions the pieces fit together the way I like.
The third reason is, I always check my seam allowance to make sure that the block is the size I want it. I don't want to get all my blocks done just to find out they are the wrong size! The wonderful thing about foundation piecing is you don't have to worry about that 1/4" seam allowance!
With this house block I am glad I made a test block because I realized that when I went to piece the sections together, I ended up with a "y" seam. (See part one of this project post.) Not that I don't like "y" seams, but they just take a little longer to piece than regular ones. So, I went back to the EQ design and regrouped the foundation sections so that there were no "y" seams. So instead of 4 sections there are now 5 sections. (They look backwards because when you print out foundation sections you choose a mirror image.)

I then again wrote the cutting sizes on each section, labeling whether they were dark or light. I got out my small baggies and labeled them with the section (A, B, etc.), the size of the pieces to cut, and how many of them to cut per section. To make cutting quicker I layered the fat eighths 3 at a time, cut out the strips and sub-cut the pieces I needed, placing them in the correct baggie. I find that organizing them this way, I can sew each section, chain piecing and get 3 or 4 done at a time. This might be a little time consuming in the beginning, but you will see that it makes finding the right pieces so much easier, actually saving time in the long run. (When I am finally ready to sew, I don't want to go back to have to cut out pieces. Unless of course I didn't do my math right!)


I'm going to try to illustrate with photos how to foundation piece with freezer paper. It will probably make more sense when you do it following my written instructions.
I have a mantra when I paper piece. Four basic steps: Press, fold, trim, sew. When I teach this method in my New York Beauty classes I give the students a "cheat sheet" with these steps on and tell them to repeat them as they sew.
You can fold the foundation sections on the lines before you begin to sew or as you are sewing. I chose to fold them first using a business card or some type of thick card stock.
Step 1. Press your first section, wrong side of fabric to the shiny side of the paper. Try to limit your pressing to section one only and make sure that the fabric sticks out of each side for trimming later. You can see that the fabric hangs out past the edge of the foundation section and beyond the lines inside.

Step 2. Fold back the foundation section on the line.
Step 3. Using an Add-a-Quarter or any ruler, trim the edge to 1/4".

Step 4. Place the next fabric right sides together, lining up the edges and sew ALONG THE FOLD of the foundation. I use an open toe foot and move my needle all the way to the right so I have a guide to keep the paper straight and the needle as close to the fold as I can. No need to shorten the stitch since we will not be tearing it off. Start sewing a few stitches before and beyond the seam line of the foundation section.

Back to step 1. First finger press the fabric on the right side then turn it over and press it to the freezer paper to the next fold line.

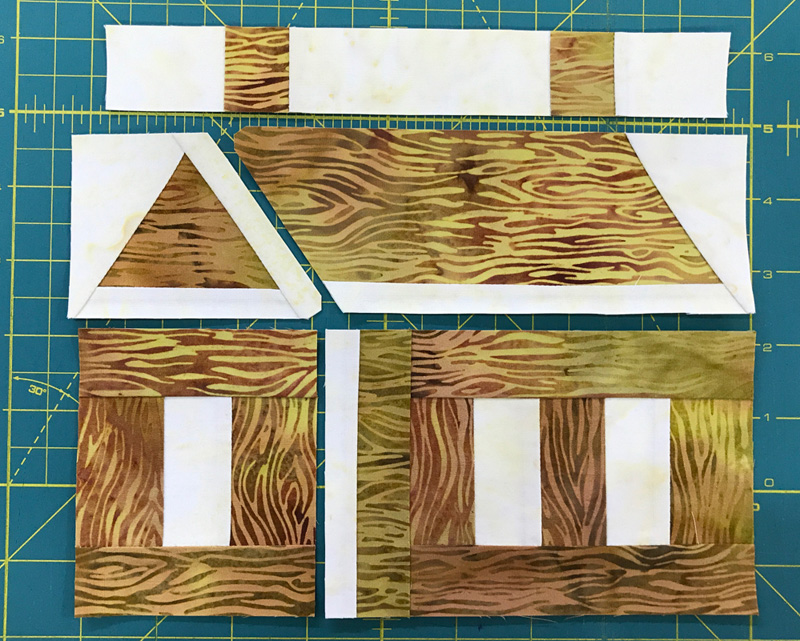
Continue following these four steps until the section is completed. Trim the excess fabric off along the outside line and gently remove the paper, being careful not to pull any seams open. If you find that you have problems doing that, then do a small backstitch at the beginning and end when sewing on the outside edges. Here are all 5 sections completed. Now they are ready to sew together (this time without the "y" seam).
Here are the first four blocks done (only 9 more to go).

Oops! Can you see my mistake? Easy to fix. (Leave a comment to let me know what I did wrong.)
In the next and final installment of this project, I will show how I got the inspiration for the setting and the completed quilt. (And what I did to fix my mistake.)
I have started a new Yahoo group page called Toby Lischko's Creative Quilting Group. I hope you will join and share your projects!
As always: Do what you love and love what you do. Thank you for reading and please share with your friends. Toby
Save 33% on a full price Craftsy class (including my Clever Curves). Code:INSTRUCTORENROLLAPRIL. Use this link to take you there. Craftsy class. Coupon good until 4/30/18.


7 comments:
Oops - you didn't get a background piece sewn on the side of one house top! I will definitely have to try this method next time I paper piece something, you did a great job of explaining it!
LOVE the houses in batiks! The fourth house has an, um, extra attic space! Thanks for providing such comprehensive instructions. You make it looks so easy.
Top left root is missing the sky piece. Van easy fix! Thanks for such clear directions.
I am loving the way this looks. I have done this and it is really a great method for paperpiecing. You explained it very well. And the one house on the bottom right seems to have an extended roof!
Thank You for clear instruction on how to use the freezer paper for foundation piecing. I'll definitely give that method a try. I see your mistake - the missing 'sky' piece next to the gable on the green block (lower left in group photo). That will be an easy fix.
Well, everyone reading these comments will see that I am directionaly challenged, don't know left from right! Ha - ha!
Green house didn't do a triangle for the attic.
Post a Comment