THE GREAT OUTDOOR CHALLENGE
Welcome back! Today I will show you how I get ready to sew my paper pieced patterns and how I use freezer paper as my foundation so I don't have to tear paper off at the end. I know I have shown this in previous blogs but in case you missed them here it is again.
You can use your inkjet printer to print the foundation section on freezer paper. I sell 8-1/2" x 11" sheets on my website (Freezer paper sheets). Before printing on the freezer paper check to see how the paper is fed so that you end up printing on the paper side not the shiny side. Write an "X" on one side of the paper and feed it through. That way you can see which side is being printed on.
The first thing I do is make a template for each of the sections of my foundation. I do this because I want to have as little waste as possible and so that I know the piece I cut will fit properly in the space. I use heavy template plastic for this.
After making the templates I measure the length of the template and cut a strip of fabric that is 1/2" larger than it. Or you can just use scraps as long as they are big enough.
When I cut out the pieces I use an Add-a-Quarter or Add-an-Eighth ruler (also available on my website) all the way around it so that the piece is slightly bigger than the section.
I do this for all of the templates in the set. I try to cut out all of my pieces so that when I am ready to sew, I don't have to stop. (That is if I do the math correct!) Some of the pieces have a right and left section so if I cut them with the fabric wrong sides together, I will get a left and right cut at the same time. Because you don't have to worry about accuracy you can cut multiple layers at a time.
The first step in using freezer paper is to get the iron hot. Then iron the first piece, wrong side of fabric to the shiny side of the paper. Don't hold the iron on too long or it will make the freezer paper hard to remove. (The edge of the fabric is poking out of the edge of the paper.)
Next, fold back the paper along the line between 1 and 2. I used the long template to help crease the paper along that line. Trim your seam to 1/4" using the Add-a-Quarter ruler. The small ledge on the ruler bumps up against the fold of the paper.
Before lining up the next fabric patch right sides together, to the cut edge, I check to make sure that my piece is facing the same direction as the image on the paper. Then I place them right sides together, checking to see that I have fabric covering the seam allowance on both ends.
Now instead of folding the paper back, I leave it folded and sew as close to the fold as possible. I don't have to change my stitch length but I do usually sew at a 2.0. I use an open toe foot so I can see it better and move my needle all the way to the right.
Finger press the fabric along the seam, turn the paper over and then iron that section to the freezer paper.
Repeat this process for every section. I have a mantra I say: "Press, Fold, Trim, Sew". That way I don't forget a step! When I get all of the center pieces on, I go ahead and trim the seam allowance on the last 3 sections to get ready to sew the background on.
Once I have finished my entire section. I place the 1/4" line of the ruler on the 1/4" seam line on the foundation and trim all of the way around. I can then take off my freezer paper and it is ready to use for the next set. Since it has been folded once, I don't need to use a card to fold it along the lines anymore.
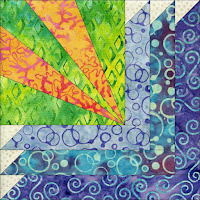
To make the process go quicker, I will chain sew 4 or 5 at a time, sewing the same section on each time. Here are the 5 different combinations I put together. (It is hard to see the white background against my design wall.)
In the next blog I will show how to sew those little triangles on the ends of the logs using squares and how to put the whole block together.
Be sure to leave a comment if you want to be in a drawing for a batik fabric bundle of this collection. Don't forget to leave some contact information so I can contact you if you get chosen. (USA only due to shipping charges.)
As always: Do what you love and love what you do.
Check out the other Ambassadors and their blogs.
Monday, August 6 - All A Flutter - Yellow Cat Quilt Designs, Creative Blonde
Tuesday, August 7 - Birds N’ Bees - Ark Angel Creations, Patterns By Jen
Wednesday, August 8 - Canterbury Manor - Sally Manke, Powered By Quilting
Thursday, August 9 - Eclectic Garden - Desert Bloom Quilting, Sew Karen-ly Created
Friday, August 10 - Vintage Morris - MooseStash Quilting, Devoted Quilter
Monday, August 13 - Safari - Sew Incredibly Crazy, SweetGrass Designs
Tuesday, August 14 - Spring Blossoms - Mary Mack Made Mine, If These Threads Could Talk
Wednesday, August 15 - Victoria and Albert - Bejeweled Quilts, Clever Chameleon
Thursday, August 16 - Wild Things - Freemotion By The River, Kauffman Designs
Friday, August 17 - Petting Zoo - Den Syende Himmel, Sarah Goer Quilts
Monday, August 20 - Ocean Odyssey - Gateway Quilts, The Quilt Rambler
Tuesday, August 21 - British Rose - Busy Hands Quilts, Mania for Quilts
Wednesday, August 22 - Dear William - The Inquiring Quilter, mmm! Quilts, Living Water Quilter
Thursday, August 23 - Dragonfly Dreams - Inchworm Fabrics, BeaQuilter
Friday, August 24 - Fur-ocious Friends - Quilting Affection Designs, Dizzy Quilter
Monday, August 27 - Globetrotter - Pamela Quilts, Curliecue Creations
Tuesday, August 28 - Jungle Cruise - Vicki's Crafts and Quilting, Little Bunny Quilts
Wednesday, August 29 - Lavendula - Carole Lyles Shaw, Masterpiece Quilting
Thursday, August 30 - London Calling - Quilt in a Not-Shell, Lizard Creek Quilting
Friday, August 31 - Spirit Rhythm - Steph Jacobson, Whispers of Yore
Monday, September 3 - Sweet Tweets - Kathleen McMusing, Adventurous Applique and Quilting
Tuesday, September 4 - Whatnot - heARTS Creations, Slice of Pi Quilts

Expiration Date: 08/19/2018
Restrictions: Exclusions apply. Please see additional terms and conditions in coupon


