Search This Blog

Showing posts with label #janome. Show all posts

Monday, April 16, 2018

ISLAND BATIK AMBASSADOR APRIL CHALLENGE Part 2


Whenever I start a new quilt or block I always do a test block first, before cutting out the fabric I plan to use with the actual quilt. There are a couple reasons why I do this. One is I want to make sure that I like where I put the fabrics. When I first started quilting (before the design programs were available) I just thought that the fabrics I picked would work out fine in the places where I had planned to put them. Well lesson learned, after I cut out all of the pieces for a quilt and I put a block together and realized I did not like the way the block looked! Even though now I use Electric Quilt to design my quilts, I do sometimes change the way I arranged the fabrics.

Another reason is I like to check my pressing directions as I am making it so when I write the instructions the pieces fit together the way I like.

The third reason is, I always check my seam allowance to make sure that the block is the size I want it. I don't want to get all my blocks done just to find out they are the wrong size! The wonderful thing about foundation piecing is you don't have to worry about that 1/4" seam allowance!

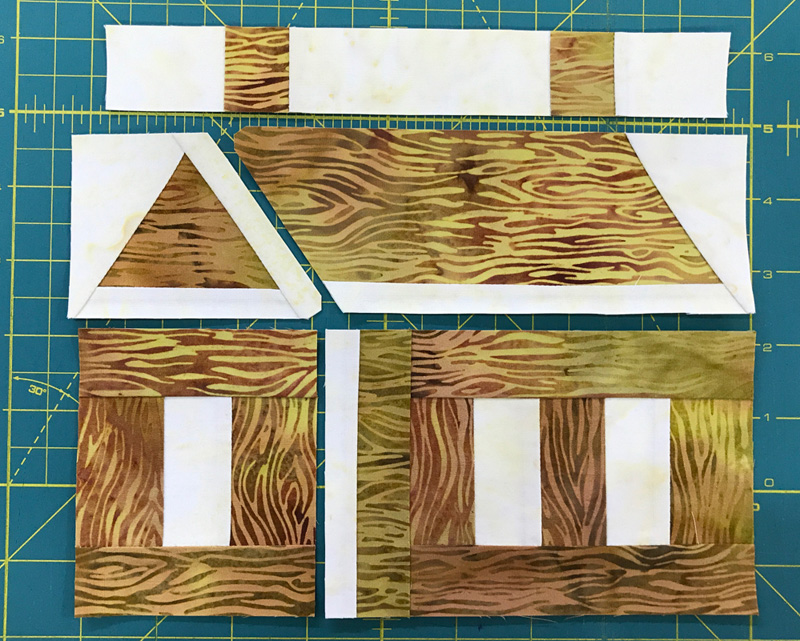
With this house block I am glad I made a test block because I realized that when I went to piece the sections together, I ended up with a "y" seam. (See part one of this project post.) Not that I don't like "y" seams, but they just take a little longer to piece than regular ones. So, I went back to the EQ design and regrouped the foundation sections so that there were no "y" seams. So instead of 4 sections there are now 5 sections. (They look backwards because when you print out foundation sections you choose a mirror image.)
I then again wrote the cutting sizes on each section, labeling whether they were dark or light. I got out my small baggies and labeled them with the section (A, B, etc.), the size of the pieces to cut, and how many of them to cut per section. To make cutting quicker I layered the fat eighths 3 at a time, cut out the strips and sub-cut the pieces I needed, placing them in the correct baggie. I find that organizing them this way, I can sew each section, chain piecing and get 3 or 4 done at a time. This might be a little time consuming in the beginning, but you will see that it makes finding the right pieces so much easier, actually saving time in the long run. (When I am finally ready to sew, I don't want to go back to have to cut out pieces. Unless of course I didn't do my math right!)


I'm going to try to illustrate with photos how to foundation piece with freezer paper. It will probably make more sense when you do it following my written instructions. 

I have a mantra when I paper piece. Four basic steps: Press, fold, trim, sew. When I teach this method in my New York Beauty classes I give the students a "cheat sheet" with these steps on and tell them to repeat them as they sew.

You can fold the foundation sections on the lines before you begin to sew or as you are sewing. I chose to fold them first using a business card or some type of thick card stock.

Step 1. Press your first section, wrong side of fabric to the shiny side of the paper. Try to limit your pressing to section one only and make sure that the fabric sticks out of each side for trimming later. You can see that the fabric hangs out past the edge of the foundation section and beyond the lines inside.
Step 2. Fold back the foundation section on the line.
Step 3. Using an Add-a-Quarter or any ruler, trim the edge to 1/4".
Step 4. Place the next fabric right sides together, lining up the edges and sew ALONG THE FOLD of the foundation. I use an open toe foot and move my needle all the way to the right so I have a guide to keep the paper straight and the needle as close to the fold as I can. No need to shorten the stitch since we will not be tearing it off. Start sewing a few stitches before and beyond the seam line of the foundation section.

Back to step 1. First finger press the fabric on the right side then turn it over and press it to the freezer paper to the next fold line.
Continue following these four steps until the section is completed. Trim the excess fabric off along the outside line and gently remove the paper, being careful not to pull any seams open. If you find that you have problems doing that, then do a small backstitch at the beginning and end when sewing on the outside edges. Here are all 5 sections completed. Now they are ready to sew together (this time without the "y" seam).
Here are the first four blocks done (only 9 more to go).
Oops! Can you see my mistake? Easy to fix. (Leave a comment to let me know what I did wrong.)

In the next and final installment of this project, I will show how I got the inspiration for the setting and the completed quilt. (And what I did to fix my mistake.)

I have started a new Yahoo group page called Toby Lischko's Creative Quilting Group. I hope you will join and share your projects!

As always: Do what you love and love what you do. Thank you for reading and please share with your friends. Toby

Save 33% on a full price Craftsy class (including my Clever Curves). Code:INSTRUCTORENROLLAPRIL. Use this link to take you there. Craftsy class. Coupon good until 4/30/18.


  Nesting Box Mystery Quilting Box

Quilted Bags

Wednesday, March 28, 2018

ISLAND BATIK MARCH CHALLENGE PART 2


This quilt has been a learning experience for me. Not only did I make a block that I have never made before, I used some stitches on my new sewing machine that I don't use, and tried a new binding technique.

I did have to draw a new name for the last drawing. Mona Phelps of Versailles, Kentucky won the mini challenge prize. Congrats Mona! Your prize went in the mail today.

After making the Dresden plates (one whole center and four corners) I placed them on the background fabric. I chose black, not only because I like black in quilts, but I thought it would accent these fabric better than a light background. I over-cut my center square so that I could square it off after attaching the plate to the fabric.
I didn't want to sew the tips down, so I used some decorative stitches on my new Janome sewing machine. I purchased this machine at the AQS show in Grand Rapids, MI after teaching a class with it. It had some wonderful features and I really liked the way it sewed.
Before sewing on the actual block, I had to figure out which thread(s) and decorative stitches I wanted to use, so I played around on some blades that I had sewn together just to play on. I had to determine how wide to make the stitch and the length of the stitch to use. Once I found what I liked I made a chart of the stitch, width and length number. I ended up using Superior's Rainbows thread. It is a very fine variegated polyester thread. I didn't want the stitches to overpower the quilt.


Before sewing the plates down, I pinned them in every blade to hold it down to the backing. Here I sewed down along all the seam lines on the blades. Since I had 6 different blades, I used 6 different decorative stitches.
After stitching all of the blades down, I trimmed the center square and sewed them together. I didn't need to trim the triangles since I cut the long edges to match the edges of the square. (The finished size of the square plus 7/8" cut into 2 half-square triangles.)

Now I needed to put the small circles (and quarter-square circles) on the centers of the blocks. I like to use a freezer paper method of making my appliqué circles. I wasn't doing raw edge appliqué so I added 1/2" to the center circle and cut out the fabric. I then cut a circle of freezer paper that was 1/2" smaller. I placed this shiny side up on the back of the fabric circle, centering it.
I then used a hot iron and slowly pressed the edges of the circle down on the freezer paper making sure that I didn't press any pleats as I went along. Because the shiny side is up it stuck to the paper. I did the same process with the quarter circles for the corner units but only had to press under the curved edge. 


Since the shiny side is in the center I can press it onto the block so that it is stabilized before I started to stitch it down.
I used a blanket stitch.
After sewing, I cut the center out of the back and pulled out the freezer paper. If a few pieces of paper remain, it won't be noticeable. Now I could sew all of the sections together.
I couldn't decide whether or not I wanted to put a border on it so I played with a couple options on my design wall and came up with a small border print that matched one of the fabrics. I was directional so I had to cut it both lengthwise and crosswise. I mitered the corners.
I layered my quilt top, batting ( I used Quilter's Dream Black poly) and backing and started to quilt it on my longarm machine. I just quilted a quarter inch inside the blades with the new Superior MicroQuilter thread. You can see information about it here: Superior MicroQuilter.
I don't want my quilting to overpower the quilt so I like that it is a very fine thread. I also used that thread in the border. I started to echo stitch with a black thread around the petals, but realized that it would not be as accurate as doing it on my regular sewing machine since I wanted to stitch it in 1/4" intervals, so I took it off the machine and proceeded to finish it on my regular sewing machine, using the edge of my quarter inch foot as my guide.

Since this was a month for trying new things, I decided to try a new method of binding. I watched Sharon Schamber's YouTube video on both bias binding and straight binding and tried her method. I really like the way she sewed her seams when connecting the strips and her finishing method. It really increased the accuracy of the binding. You can watch both her videos here (no affiliation). If the videos don't work, try the links under the images. 

Here is my finished quilt.
Thank you for reading! I hope that you also learned some new things along with me. 

Again I will be having a prize drawing of some fat eights of this collection and my personally designed acrylic "Binding Minder". To be eligible please leave a comment as to what you learned  from this blog. Don't forget to leave some way of contacting you. I will have an extra prize for anyone who can give a name to this quilt that I like.

As always, do what you love and love what you do. Feel free to forward and share this blog with your quilting friends.