Search This Blog

Showing posts with label #bloglovin. Show all posts

Saturday, February 9, 2019

NATIONAL QUILTER'S CIRCLE MYSTERY PAPER PIECE BLOCK 1

NATIONAL QUILTER'S CIRCLE

MYSTERY PAPER PIECED
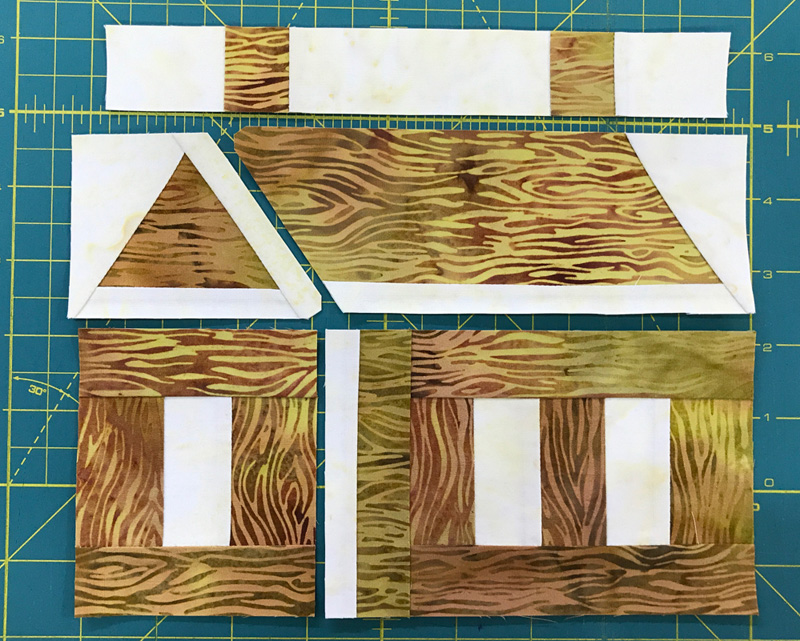
BLOCK 1


I just love quilters! What makes life so interesting is that everyone has different tastes in fabrics and colors and we are all so versatile. Seeing block 1 come to life with all the wonderful variations is so fun! Also some quilters put their blocks together differently (I don't think on purpose) but the end results are fantastic! Need the instructions you can click on BLOCK 1 and the link will take you there. If you haven't signed up for it yet, please do so you don't miss any of the instructions!

What I want to demonstrate today is how I paper piece with freezer paper. (Can't find freezer paper, I have it on my website: Freezer paper.) I have heard many comments that there is so much waste in paper piecing that quilters don't like to do it but when I show you how I use the templates to cut out my pieces you will see that there is very little waste.

If you have not done the block yet, you need to downloaded the updated corrected block 1 templates and foundation sections. If you have already made it, then you don't need to bother doing that. You can find the file under Links on the Facebook page or get it here.

First make your templates out of heavy weight plastic. It just lasts longer than the thin stuff and you can purchase it at JoAnn's or Michaels. You can also use heavy cardboard. If you use cardboard I suggest you line up your ruler along the edges so you don't cut into them. To make the templates, just cut slightly around the outside edges of them and tape them to your template material. Then cut out along the outside edge exactly making sure you trim all the little corners.

Lay your fabrics wrong sides together. I have in the instructions which fabric should be on top when cutting out so that you have the correct A or Ar (B or Br and C or Cr). The r just stands for the reverse of the original. Since I have batiks there is no really visible right or wrong sides so I can cut them with the same fabric on top. If you are not using batiks be SURE to put the correct fabric on top before cutting out. I left some space between each of the templates so I can add a 1/4" all the way around them.


Now I take my Add-a-quarter ruler and add 1/4" around the entire template as I cut the pieces out. You end up with a piece that is 1/2" bigger than the original. That gives you plenty of "play" room to cover the area that you are paper piecing. (If you want to cut the sections even larger than that, go ahead. Do what you feel comfortable doing to get it to work for you.)


Now you are ready to start sewing. I have a little mantra (a phrase that I repeat over and over) when I am paper piecing. It goes like this (this is also in the pattern): PRESS, FOLD, TRIM, SEW. It helps me get into a rhythm when I am paper piecing.

My first printing of the freezer paper did not include the shading so I made sure I wrote dark or light on my sections so I would not get confused. Instructions for printing on the freezer paper are in the pattern. (Be sure to check your printout with the 1" box on the page so that your scale is correct.) Cut out the left and right sections close to the outside line. I do not cut right on the line. 


Following the color placement (dark or light):

1. PRESS the WRONG side of the fabric (template A) to the SHINY side of the freezer paper. Your iron needs to be hot enough to slightly melt the wax but not too hot to make it difficult to remove. Test your iron to get the right setting. You should only need to leave it on the paper for a few seconds. Just press to the line between 1 and 2.

You should be able to see the fabric all the way around the outside edges and your inside edge is overlapping the seam line (solid line) by more than 1/4". The outside edges will be trimmed at the end. Be sure to always start with #1 on each section as #1 is on the bottom on one section and on the top on the other so that the seams are pressed in opposite directions.


2. I usually use a business card, but these are long stitching lines so I just use one of the templates and line it up along the line between 1 and 2. I want to see the line. The section with the fabric should be on your left (well for right handed people it is) and FOLD back the paper along that line. Make sure that it is folded exactly on that line.


3. TRIM your seam to 1/4" using the Add-a-quarter or a small ruler with a 1/4" line. The Add-a-quarter ruler has a little ledge on it and it stops at the fold of the paper so you can get an accurate cut. Can't find one in your area, you can purchase one on my website. I also carry Add-an-Eighth. Add-a-Quarter. Don't worry that the pointed edge does not go all the way down. It will be covered by the next fabric. 


4. Place your next fabric (template B) right sides together, first checking to make sure that you have the template B section in the right direction. You can see through the freezer paper and can see the direction of the point of the triangle. 


5. Line up the edge of B with the cut edge of A. Make sure that you can see your B fabric sticking out from the top and bottom of the paper. Now you are ready to SEW. I like to use an open toe foot and move my needle all the way to the right. That way the inside edge of my foot lines up with the fold of the paper. You do not have to change the length of your stitch because you are not sewing on the paper. You will sew as close to the paper as you can, starting at the top edge of the paper and sewing all the way to the bottom edge. If you accidentally sew a little on the paper don't worry. It comes out.


6. Finger press your seam then PRESS section B to the freezer paper only to the line between 2 and 3 with the iron. I always press on the paper side. Now repeat the process. You just pressed, so FOLD the paper along the line between 2 and 3 with your template edge. TRIM your seam to 1/4". Line up the edges of B and C right sides together, making sure you have fabric sticking out on the top and bottom and that it is facing in the correct direction and SEW along the fold.


Here is a little tip. If you have light and dark fabrics and don't want the dark to show through your seam on the front, place the light fabric slightly beyond the dark edge. This way the dark is hiding behind the light and won't show through the front of your block.


I give it one last press to the freezer paper and then trim my section. I don't use the outside lines. I line up the 1/4" line of my ruler on the seam line on the freezer paper. That way if the outside line is off just a little I know I will have an exact 1/4" seam. (Here are both sections done. You can see that the fabric sticks out all the way around the paper.)


Now you can remove the freezer paper. Be careful and slowly peel it off in the direction the seams are going in so you don't pull on the seams. If it is a little difficult to get off, use your iron to warm it up just a little. Now you can reuse the freezer paper. Since you have already folded it along the lines you do not need to use the template to line it up on the lines anymore. I have found that I can reuse my freezer paper up to 6 to 8 times if my fabric isn't too linty or my iron wasn't too hot. Now they are ready to sew together.


I particularly like this method because I do not like to tear paper off at the end, especially when it is a large quilt. I know some quilters have told me that they find it relaxing to tear off the paper. To each his own!!!

LIKE TO FUSSY CUT?

If you know me, you know I love to fussy cut so I had to play with this block and some of my new Paula Nadelstern fabrics I carry in my store. This one is called Rabbit Hole from her More is More collection and the pink and blue are her blenders. You see I laid out the fabrics a little different. Not on purpose, but I like the way it came out (and I didn't want to recut anything! To do this I had to use the templates and not paper piece it. You can see Paula's fabrics on my website here: Nadelstern fabrics. If you purchase any of her fabrics and mention you saw it on my blog in the comment section when checking out I will give you 10% off your fabric purchase (on the Nadelstern fabrics)!


FABRIC DRAWING


Well I know the NQC quilters are anxious to read my blog so I will get this posted. If you have any questions, don't hesitate to ask. Leave a comment and I will put your name in a drawing for some of the Timeless Treasures batiks I am using for this quilt! Be sure to give me some way to contact you if you won.

Remember: Always do what you love and love what you do. 

HAVE FUN AND SEE YOU ON THE NATIONAL QUILTER'S CIRCLE FACEBOOK PAGE. All of these blocks were designed in EQ8.

Thursday, August 30, 2018

Hearth and Home Block of the Month - Month 1

I design my quilts in EQ!


I frequently work with many of the fabric companies designing quilts to go with their new fabric collections. RJR is one of those companies that I do a lot of commission work for. They always have such beautiful fabrics that are easy to design with. In the beginning of the year they sent me a fabric collection called Family Roots which I immediately started playing with on my EQ8. I had been doing some sampler quilts with some previous companies (Soldier's Quilt) and collections so I thought I would try to do another one. I came upon with this concept. I love using log cabins in quilts and felt that this was an unusual setting that was different than other BOMs that I have seen.

RJR liked it and submitted the design to Missouri Star Quilt Company. They liked it too! So they picked it up and are selling it on their website. It is a nine month series and Missouri Star will be selling the kits each month for the next nine months. There are 13 fabrics in the quilt. Two of them come from a different fabric collection called Falls Majesty. You can purchase the first month's kit here: Hearth and Home BOM.

Each month you will receive the fabric in fat eighths, fat quarters or regular yardage to make the block(s) for that month. The pattern will include instructions for each block. To save me from having to print too many pages, I have designed cutting charts for each of the fabrics in pdf form. To receive the cutting charts you can use the contact form on this page to request them.

Each month I will be doing a short tutorial on piecing one or more of the blocks. If there is more than one technique that I will be discussing, I will divide it up into two or three separate tutorials. I will not be discussing cutting instructions or specific block piecing instructions. Those are in the pattern and you will have to purchase it with the kit if you want to make it.

To start off, before I talk about the blocks, I think it is important to discuss your 1/4" seam allowance. If you have not seen my Youtube video yet, here it is on how to establish an accurate 1/4" seam.


Because most of these blocks have numerous pieces, accuracy is very important. I always set my seam and make a test block with my own fabric. (You don't want to cut up the good fabric yet!) Measure each section for accuracy. It is easier to make adjustments at this level before sewing the parts together. Once you get that established you don't have to make any more test blocks. If you want to purchase my seam guide you can find it here: Perfect 1/4" Seam Guide.

Month 1 includes Blocks 1 and 2 and the connecting block (log cabin).


Block 1 has no special instructions. It is basically made of half-square and quarter square triangles sewn together. Just be sure to size up each section to the specifications of the pattern.

Block 2 has Half-Square triangles and Chevrons. The squares for the half-square triangles are cut slightly larger than needed so that once you piece them you can trim the patches down to size. You can either draw a line on the backs of the lighter fabric, sew 1/4" on each side of the line, cut apart and then trim the square to the size listed, or just cut them into triangles, sew them together and then trim it to the size listed. Don't be afraid of sewing on the bias. Just let the sewing machine do it's job and don't stretch the edge as you sew. I always add a pin at the end of the triangle so that the edges stay together when I sew it.

The Chevron patch is made with squares and rectangles. Again you can draw a line on the backs of the squares, sew on the line and then trim the seam to 1/4" or you can use my "Cutting Corners" template set to trim the corners and then sew with a 1/4" seam allowance. You can purchase my Cutting Corners template set here: Cutting Corners. It can be used a lot with the blocks in this quilt. 


I'll save tips for the log cabin connecting block for the next blog. 


DRAWING

As an introduction to this quilt I will be having a drawing for some fat eighths of the collection. If you would like to be in the drawing simply leave a comment at the end of this blog. You do not have to purchase the BOM kit to be in the drawing but you don't want to miss out on making this fantastic quilt! I will draw a name on September 2. Good luck.

As always, do what you love and love what you do. Thank you for reading and be sure to share this with your quilting friends. Toby.


Monday, April 16, 2018

ISLAND BATIK AMBASSADOR APRIL CHALLENGE Part 2


Whenever I start a new quilt or block I always do a test block first, before cutting out the fabric I plan to use with the actual quilt. There are a couple reasons why I do this. One is I want to make sure that I like where I put the fabrics. When I first started quilting (before the design programs were available) I just thought that the fabrics I picked would work out fine in the places where I had planned to put them. Well lesson learned, after I cut out all of the pieces for a quilt and I put a block together and realized I did not like the way the block looked! Even though now I use Electric Quilt to design my quilts, I do sometimes change the way I arranged the fabrics.

Another reason is I like to check my pressing directions as I am making it so when I write the instructions the pieces fit together the way I like.

The third reason is, I always check my seam allowance to make sure that the block is the size I want it. I don't want to get all my blocks done just to find out they are the wrong size! The wonderful thing about foundation piecing is you don't have to worry about that 1/4" seam allowance!

With this house block I am glad I made a test block because I realized that when I went to piece the sections together, I ended up with a "y" seam. (See part one of this project post.) Not that I don't like "y" seams, but they just take a little longer to piece than regular ones. So, I went back to the EQ design and regrouped the foundation sections so that there were no "y" seams. So instead of 4 sections there are now 5 sections. (They look backwards because when you print out foundation sections you choose a mirror image.)
I then again wrote the cutting sizes on each section, labeling whether they were dark or light. I got out my small baggies and labeled them with the section (A, B, etc.), the size of the pieces to cut, and how many of them to cut per section. To make cutting quicker I layered the fat eighths 3 at a time, cut out the strips and sub-cut the pieces I needed, placing them in the correct baggie. I find that organizing them this way, I can sew each section, chain piecing and get 3 or 4 done at a time. This might be a little time consuming in the beginning, but you will see that it makes finding the right pieces so much easier, actually saving time in the long run. (When I am finally ready to sew, I don't want to go back to have to cut out pieces. Unless of course I didn't do my math right!)


I'm going to try to illustrate with photos how to foundation piece with freezer paper. It will probably make more sense when you do it following my written instructions. 

I have a mantra when I paper piece. Four basic steps: Press, fold, trim, sew. When I teach this method in my New York Beauty classes I give the students a "cheat sheet" with these steps on and tell them to repeat them as they sew.

You can fold the foundation sections on the lines before you begin to sew or as you are sewing. I chose to fold them first using a business card or some type of thick card stock.

Step 1. Press your first section, wrong side of fabric to the shiny side of the paper. Try to limit your pressing to section one only and make sure that the fabric sticks out of each side for trimming later. You can see that the fabric hangs out past the edge of the foundation section and beyond the lines inside.
Step 2. Fold back the foundation section on the line.
Step 3. Using an Add-a-Quarter or any ruler, trim the edge to 1/4".
Step 4. Place the next fabric right sides together, lining up the edges and sew ALONG THE FOLD of the foundation. I use an open toe foot and move my needle all the way to the right so I have a guide to keep the paper straight and the needle as close to the fold as I can. No need to shorten the stitch since we will not be tearing it off. Start sewing a few stitches before and beyond the seam line of the foundation section.

Back to step 1. First finger press the fabric on the right side then turn it over and press it to the freezer paper to the next fold line.
Continue following these four steps until the section is completed. Trim the excess fabric off along the outside line and gently remove the paper, being careful not to pull any seams open. If you find that you have problems doing that, then do a small backstitch at the beginning and end when sewing on the outside edges. Here are all 5 sections completed. Now they are ready to sew together (this time without the "y" seam).
Here are the first four blocks done (only 9 more to go).
Oops! Can you see my mistake? Easy to fix. (Leave a comment to let me know what I did wrong.)

In the next and final installment of this project, I will show how I got the inspiration for the setting and the completed quilt. (And what I did to fix my mistake.)

I have started a new Yahoo group page called Toby Lischko's Creative Quilting Group. I hope you will join and share your projects!

As always: Do what you love and love what you do. Thank you for reading and please share with your friends. Toby

Save 33% on a full price Craftsy class (including my Clever Curves). Code:INSTRUCTORENROLLAPRIL. Use this link to take you there. Craftsy class. Coupon good until 4/30/18.


  Nesting Box Mystery Quilting Box

Quilted Bags

Wednesday, March 1, 2017

STATE BLOCK CHALLENGE/FLORIDA BLOCKS 9A AND B

I'm baaaaack! I apologize for the long delay in posting the next state blocks. If you saw my last post (in December) I showed you a photo of my newest family members. Two Belgian Malinois puppies. Well after that post, my husband and I were getting very little sleep! If you know anything about that breed, they are very high maintenance. Super intelligent and super hyper. They weren't difficult to train, but trying to keep up with all of that energy was exhausting. Even though some people thought we were crazy to get two of them, we found that to be a blessing, because they entertain each other to get rid of some of that energy. If we had gotten only one puppy we can't imagine how much crazier our lives would have been. Here is the most recent photo of them. They are now 6 months old.


We got them at 8 weeks. The largest one (Burke) back then weighed 11 pounds. He now weighs over 50! Hare was 9 pounds and he now weighs about 45. They still act like puppies, but they certainly don't look like puppies! We are enjoying them so much. Even though we still miss Lucy (our other Malinois) they do fill a big void that losing her left.

Now to get back to business. I had taken a break after that last block, because of the holiday and after the first of the year I fell into a quilting funk. I really had no interest in doing any quilting at all. I kept telling myself that I needed to get back to these blocks but I started watching the "Outlander" series with my new DVR with Direct TV and I couldn't stop. So I watched 26 shows in about 3 weeks! 

I'm not a big TV addict, but because now that I could tape whole series of programs I had never had a chance to watch, I started watching TV more. It almost became an addiction. It was just like when I start playing a new game on my iPhone or iPad, I can't put it down. It's a good thing that I'm not addicted to gambling or something that costs a lot of money. (I'm not including collecting fabric!)

It was really hard to find 2 Florida blocks that were doable. Block A has 69 pieces but they are all triangles and squares. Block B is a little more complicated but still not a hard block to make.

BLOCK 9A


I chose both light and dark focus fabrics, a light background, and a medium purple and medium green coordinating prints. 


Here is what you need to cut. Instead of making my own templates, I chose to use  Marti Michell Template set B and my Cutting Corners template set to cut out most of the pieces. Her template sets are available for purchase on my website. Sets A and B should cover most of the blocks that I have made and will be making because they are 3" and 4" sets which go with any 12" block. Some of the more odd shapes I still have to make my own. 

Fabric 1 - Light focus fabric cut:
* Either 16 similar repeats with Template A or two sets of 8 similar repeats with Template A. (I used Marti Michell's B13, from template set B.) You can get it here:

Fabric 2 - Dark focus fabric cut:
* Fussy cut one using template F. (I used Marti Michell's B10, from template set B.)

Fabric 3 - Light background cut:
* Four Template A. (I could use my triangle template from my Cutting Corners template set.)
 * Four Template C. (I used my square template from my Cutting Corners template set.)
* Sixteen Template E.

Fabric 4 - Purple cut:
* Four Template C.
* Eight Template A.

Fabric 5 - Green cut:
* Eight Template B. (Marti Michell B12 template set B.)
* Eight Template D.

BLOCK CONSTRUCTION

1. Make four half square triangle squares with the Fabric 1 template A sets. I have two different repeats. It is really hard to see the seams but they are there. Press to one side.


2. Make four half square triangle squares with the four of the matching sets of Fabric 1 template A and four of Fabric 3 Template A. Press to the Fabric 1.


3. Center square. Sew a matching set of the remaining four Fabric 1 Template A sets to a Fabric 2 Template F. Press to A.


4. Make four Flying Geese with the four Fabric 3 Template C and eight Fabric 4 Template A. Press to A. 


5. Sew a Fabric 5 Template D square to each side of a Fabric 3 Template E. Press to E. Make eight.

 6. Sew a unit from step 5 to each side of a Fabric 4 Template A. Make four. Press to Template A. 


7. Sew the unit from step 6 to the step 4 Flying Geese unit. Press to unit step 6. Make four.


8. Make a four patch with two Fabric 5 Template B squares, one pieced triangle from step 1 and one pieced triangle from step 2. Make four.


9.  Layout the sections as illustrated. Sew sections together across then sew rows together. Press to the side of the least number of seams.


When I started Block 9B I had picked out different fabrics and a different center for it. I wasn't happy with the color selection or the way the center looked so I changed it. Here is what it looked like before I changed it. It really changes the whole look of the block. What do you think?


BLOCK 9B


For this block I chose just the dark focus fabric, a medium pink, medium green and dark green.


Here is what you need to cut. If you kept the templates from previous blocks you will not have to make another Template D. Check through your templates and lay them on the paper images to find the right one.

Main Fabric 1 cut:
* Eight similar repeats with Template B.
* Four similar repeats with Template D.

Medium Pink Fabric 2 cut:
* Fold the fabric wrong sides together and cut out four left and four right Template A/C.

Medium Green Fabric 3 cut:
* Four Template E. 

Dark Green Fabric 4 cut:
* Four template F.

BLOCK CONSTRUCTION

1. Sew a left and right Template A/C to a Template D. Press to A/C. Make four.


 2. Sew two Fabric 1 Template B triangles together as illustrated. Make four. Press seams open.


 3. Sew the Fabric 1 pieced B triangles to the step 1 unit. Press to Template B.


4. Sew a Fabric 3 Template F to a Fabric 4 Template E. Make four. Press to E.


5. Sew two sections together from step 4. Press in same direction as the other seams. Then sew the halves together. Split the center seam and press in the same direction as the other seams (either clockwise or counter clockwise).

6. Sew the center section to each large end of the remaining two units from step 1. Press to center.


7. Sew the two units from step 3 to the sides of the step 6 section. Press seams out. (If the image looks funny, I started with a different center so I had to replace it but didn't take the whole thing apart.)


Here are the links to the templates. Remember to save them to your folder first then open them with Acrobat Reader. Let me know if you have any problems opening them.


Please feel free to leave a comment at the end. I would love to hear from some of you even if you do not participate. It is never too late to join in. You don't have to start with block 1. You can choose to make as many or few as you want. Also send me the images of the blocks when you get them done. Send them to my email at tlischko@yahoo.com. Be sure to take the photos as a "flat" shot. Tape it to a wall to get it straight on.

As always, Do what you love and love what you do.