Search This Blog

Showing posts with label #eq8. Show all posts

Thursday, August 30, 2018

Hearth and Home Block of the Month - Month 1

I design my quilts in EQ!


I frequently work with many of the fabric companies designing quilts to go with their new fabric collections. RJR is one of those companies that I do a lot of commission work for. They always have such beautiful fabrics that are easy to design with. In the beginning of the year they sent me a fabric collection called Family Roots which I immediately started playing with on my EQ8. I had been doing some sampler quilts with some previous companies (Soldier's Quilt) and collections so I thought I would try to do another one. I came upon with this concept. I love using log cabins in quilts and felt that this was an unusual setting that was different than other BOMs that I have seen.

RJR liked it and submitted the design to Missouri Star Quilt Company. They liked it too! So they picked it up and are selling it on their website. It is a nine month series and Missouri Star will be selling the kits each month for the next nine months. There are 13 fabrics in the quilt. Two of them come from a different fabric collection called Falls Majesty. You can purchase the first month's kit here: Hearth and Home BOM.

Each month you will receive the fabric in fat eighths, fat quarters or regular yardage to make the block(s) for that month. The pattern will include instructions for each block. To save me from having to print too many pages, I have designed cutting charts for each of the fabrics in pdf form. To receive the cutting charts you can use the contact form on this page to request them.

Each month I will be doing a short tutorial on piecing one or more of the blocks. If there is more than one technique that I will be discussing, I will divide it up into two or three separate tutorials. I will not be discussing cutting instructions or specific block piecing instructions. Those are in the pattern and you will have to purchase it with the kit if you want to make it.

To start off, before I talk about the blocks, I think it is important to discuss your 1/4" seam allowance. If you have not seen my Youtube video yet, here it is on how to establish an accurate 1/4" seam.


Because most of these blocks have numerous pieces, accuracy is very important. I always set my seam and make a test block with my own fabric. (You don't want to cut up the good fabric yet!) Measure each section for accuracy. It is easier to make adjustments at this level before sewing the parts together. Once you get that established you don't have to make any more test blocks. If you want to purchase my seam guide you can find it here: Perfect 1/4" Seam Guide.

Month 1 includes Blocks 1 and 2 and the connecting block (log cabin).


Block 1 has no special instructions. It is basically made of half-square and quarter square triangles sewn together. Just be sure to size up each section to the specifications of the pattern.

Block 2 has Half-Square triangles and Chevrons. The squares for the half-square triangles are cut slightly larger than needed so that once you piece them you can trim the patches down to size. You can either draw a line on the backs of the lighter fabric, sew 1/4" on each side of the line, cut apart and then trim the square to the size listed, or just cut them into triangles, sew them together and then trim it to the size listed. Don't be afraid of sewing on the bias. Just let the sewing machine do it's job and don't stretch the edge as you sew. I always add a pin at the end of the triangle so that the edges stay together when I sew it.

The Chevron patch is made with squares and rectangles. Again you can draw a line on the backs of the squares, sew on the line and then trim the seam to 1/4" or you can use my "Cutting Corners" template set to trim the corners and then sew with a 1/4" seam allowance. You can purchase my Cutting Corners template set here: Cutting Corners. It can be used a lot with the blocks in this quilt. 


I'll save tips for the log cabin connecting block for the next blog. 


DRAWING

As an introduction to this quilt I will be having a drawing for some fat eighths of the collection. If you would like to be in the drawing simply leave a comment at the end of this blog. You do not have to purchase the BOM kit to be in the drawing but you don't want to miss out on making this fantastic quilt! I will draw a name on September 2. Good luck.

As always, do what you love and love what you do. Thank you for reading and be sure to share this with your quilting friends. Toby.


Monday, August 20, 2018

ISLAND BATIK AMBASSADOR AUGUST CHALLENGE PART 3


The Great Outdoors Blog hop

The great outdoors are what inspired the this hop’s theme. Throughout the month of August, our Ambassadors will be featuring Island Batik’s newest fabrics, appearing on shop shelves SOON! See something you like? Ask for it at your local quilt shop, or request it if you don’t yet see it. We have the most delicious collections to share with you!


Today is my day and as usual I was down to the wire. I put the binding on the quilt at 9:00 last night. I don't think I have ever put on a binding on as quick a time as I did this one. ****Be sure to read all the way to the end so you learn how you can be eligible to win a fat quarter batik bundle and my Cutting Corners template set and a strip pack from Island Batik.****

Before I reveal the quilt I want to show how I made the second part of the block. The patches that attaches to the flower have triangles on the ends of them. They are made with squares. You can draw a line on the backs of the squares and sew on the drawn line or you can do what I do and use my "Cutting Corners" template set.

Place the square on the right end of the smaller rectangle strip. Make sure that the edges are perfectly lined up.

Using the triangle in the set, line up the edge of the triangle on the left edge of the square with the top of the triangle even with the top of the square. The diagonal line should go through the bottom right corner.

Using your rotary cutter, trim off the corner and sew with a 1/4" seam.

You will repeat the process with the longer strip except place the strip vertically with the square at the top of the strip. 


You will end up with a left and right strip.


You piece the rest of the block like a log cabin.
                                             
I was working on this quilt during a quilt retreat called "Summer Breeze" so I asked the group what should I call the quilt and they said call it "Summer Breeze" after the retreat! I pieced many of the blocks at the retreat so I laid down the pieces to see what they would look like. ( I was still missing 4 blocks.)


I then thought, what would it look like with white sashing strips? I definitely liked this version better.


After I got home, I finished the blocks and put it on my design wall. I couldn't decide on whether I wanted to put on a border or not so I cut some strips to see what it would look like with a border. I also added four orange corner stones where the flowers came together.

Without borders

With borders

I decided to go ahead with the small border. Here it is on my quilting machine. I decided to quilt the background with small circles to match the border print (which is actually bubbles).


So.......here is the finished quilt! It is 57" square with an 8" block.


A close-up of the quilting


I really had fun making this one. I decided to make a pattern of it so I am offering a special discount if you preorder the pattern. (It will take me a couple weeks to write it.) The pattern will come with enough freezer paper sheets to make the 24 blocks. So for a limited time you can get the pattern for $12 (regular price will be $15 with the foundation papers). I will make the pattern available in pdf form after it is written. It will be $12 regular price.

You can preorder the pattern here: Summer Breeze Pattern.

I used 25 fabrics from the collection. 5 groups of 5 fabrics. It was my surprise bundle in my box from them. You can see the whole collection here:
Ocean Odyssey by Island Batik

ISLAND BATIK GIVEAWAY

Island Batik is giving away three strip packs in their Rafflecopter, just follow this link.


GATEWAY QUILTS GIVEAWAY

I will be having a drawing for a fat eighth bundle of the collection and my Cutting Corners template set. Just leave a comment to be in the drawing. I will draw a name a week from today (August 27). Be sure to leave your email so that I can contact you if you win. US only due to shipping charges.

As always: Do what you love and love what you do. Feel free to share my blog with your quilting friends. Thank you for reading. Toby

Be sure to check out the other blog posts especially Karen Overton's who also used Ocean Odyssey in her quilt.

Monday, August 6 - All A Flutter - Yellow Cat Quilt DesignsCreative Blonde

Tuesday, August 7 - Birds N’ Bees - Ark Angel CreationsPatterns By Jen

Wednesday, August 8 - Canterbury Manor - Sally MankePowered By Quilting

Thursday, August 9 - Eclectic Garden - Desert Bloom QuiltingSew Karen-ly Created

Friday, August 10 - Vintage Morris - MooseStash QuiltingDevoted Quilter

Monday, August 13 - Safari - Sew Incredibly CrazySweetGrass Designs

Tuesday, August 14 - Spring Blossoms - Mary Mack Made MineIf These Threads Could Talk

Wednesday, August 15 - Victoria and Albert - Bejeweled QuiltsClever Chameleon

Thursday, August 16 - Wild Things - Freemotion By The RiverKauffman Designs

Friday, August 17 - Petting Zoo - Den Syende HimmelSarah Goer Quilts

Monday, August 20 - Ocean Odyssey - Gateway QuiltsThe Quilt Rambler

Tuesday, August 21 - British Rose - Busy Hands QuiltsMania for Quilts

Wednesday, August 22 - Dear William - The Inquiring Quiltermmm! QuiltsLiving Water Quilter

Thursday, August 23 - Dragonfly Dreams - Inchworm FabricsBeaQuilter

Friday, August 24 - Fur-ocious Friends - Quilting Affection DesignsDizzy Quilter

Monday, August 27 - Globetrotter - Pamela QuiltsCurliecue Creations

Tuesday, August 28 - Jungle Cruise - Vicki's Crafts and QuiltingLittle Bunny Quilts

Wednesday, August 29 - Lavendula - Carole Lyles ShawMasterpiece Quilting

Thursday, August 30 - London Calling - Quilt in a Not-ShellLizard Creek Quilting

Friday, August 31 - Spirit Rhythm - Steph JacobsonWhispers of Yore

Monday, September 3 - Sweet Tweets - Kathleen McMusingAdventurous Applique and Quilting

Tuesday, September 4 - Whatnot - heARTS CreationsSlice of Pi Quilts


Monday, April 16, 2018

ISLAND BATIK AMBASSADOR APRIL CHALLENGE Part 2


Whenever I start a new quilt or block I always do a test block first, before cutting out the fabric I plan to use with the actual quilt. There are a couple reasons why I do this. One is I want to make sure that I like where I put the fabrics. When I first started quilting (before the design programs were available) I just thought that the fabrics I picked would work out fine in the places where I had planned to put them. Well lesson learned, after I cut out all of the pieces for a quilt and I put a block together and realized I did not like the way the block looked! Even though now I use Electric Quilt to design my quilts, I do sometimes change the way I arranged the fabrics.

Another reason is I like to check my pressing directions as I am making it so when I write the instructions the pieces fit together the way I like.

The third reason is, I always check my seam allowance to make sure that the block is the size I want it. I don't want to get all my blocks done just to find out they are the wrong size! The wonderful thing about foundation piecing is you don't have to worry about that 1/4" seam allowance!

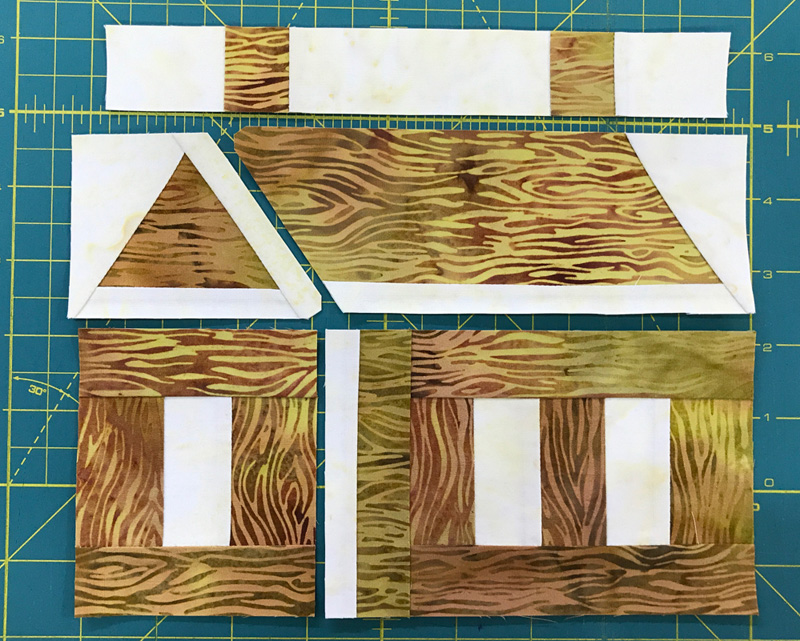
With this house block I am glad I made a test block because I realized that when I went to piece the sections together, I ended up with a "y" seam. (See part one of this project post.) Not that I don't like "y" seams, but they just take a little longer to piece than regular ones. So, I went back to the EQ design and regrouped the foundation sections so that there were no "y" seams. So instead of 4 sections there are now 5 sections. (They look backwards because when you print out foundation sections you choose a mirror image.)
I then again wrote the cutting sizes on each section, labeling whether they were dark or light. I got out my small baggies and labeled them with the section (A, B, etc.), the size of the pieces to cut, and how many of them to cut per section. To make cutting quicker I layered the fat eighths 3 at a time, cut out the strips and sub-cut the pieces I needed, placing them in the correct baggie. I find that organizing them this way, I can sew each section, chain piecing and get 3 or 4 done at a time. This might be a little time consuming in the beginning, but you will see that it makes finding the right pieces so much easier, actually saving time in the long run. (When I am finally ready to sew, I don't want to go back to have to cut out pieces. Unless of course I didn't do my math right!)


I'm going to try to illustrate with photos how to foundation piece with freezer paper. It will probably make more sense when you do it following my written instructions. 

I have a mantra when I paper piece. Four basic steps: Press, fold, trim, sew. When I teach this method in my New York Beauty classes I give the students a "cheat sheet" with these steps on and tell them to repeat them as they sew.

You can fold the foundation sections on the lines before you begin to sew or as you are sewing. I chose to fold them first using a business card or some type of thick card stock.

Step 1. Press your first section, wrong side of fabric to the shiny side of the paper. Try to limit your pressing to section one only and make sure that the fabric sticks out of each side for trimming later. You can see that the fabric hangs out past the edge of the foundation section and beyond the lines inside.
Step 2. Fold back the foundation section on the line.
Step 3. Using an Add-a-Quarter or any ruler, trim the edge to 1/4".
Step 4. Place the next fabric right sides together, lining up the edges and sew ALONG THE FOLD of the foundation. I use an open toe foot and move my needle all the way to the right so I have a guide to keep the paper straight and the needle as close to the fold as I can. No need to shorten the stitch since we will not be tearing it off. Start sewing a few stitches before and beyond the seam line of the foundation section.

Back to step 1. First finger press the fabric on the right side then turn it over and press it to the freezer paper to the next fold line.
Continue following these four steps until the section is completed. Trim the excess fabric off along the outside line and gently remove the paper, being careful not to pull any seams open. If you find that you have problems doing that, then do a small backstitch at the beginning and end when sewing on the outside edges. Here are all 5 sections completed. Now they are ready to sew together (this time without the "y" seam).
Here are the first four blocks done (only 9 more to go).
Oops! Can you see my mistake? Easy to fix. (Leave a comment to let me know what I did wrong.)

In the next and final installment of this project, I will show how I got the inspiration for the setting and the completed quilt. (And what I did to fix my mistake.)

I have started a new Yahoo group page called Toby Lischko's Creative Quilting Group. I hope you will join and share your projects!

As always: Do what you love and love what you do. Thank you for reading and please share with your friends. Toby

Save 33% on a full price Craftsy class (including my Clever Curves). Code:INSTRUCTORENROLLAPRIL. Use this link to take you there. Craftsy class. Coupon good until 4/30/18.


  Nesting Box Mystery Quilting Box

Quilted Bags

Friday, April 6, 2018

ISLAND BATIK AMBASSADOR APRIL CHALLENGE Part 1


This month's challenge is to make a new quilt from an old block. Since I consider myself a traditional quilter I use traditional blocks all the time for my patterns. I thought about using one of my patterns, but then I realized that since this is a challenge, I should do something different.

I want to congratulate the winners of my last blog. The first name I pulled was Anita Skjellanger. I found out that she lives in Norway!
Since shipping is so expensive to send this overseas I offered her one
of my patterns instead and pulled another name. The second winner
is Peggy True. She won my Binding Minder and 4 fat eighths from 
Batiks.

I want everyone to see how my brain works when I am designing a quilt so there will be several blogs related to this challenge. Plus, I am working on other quilts at the same time (nothing unusual) so these posts will be intermittent through the month of April.

I have always liked the house block. There are many versions of the block, especially in EQ8. Some easy, some more complicated.  I ended up using this one that was in the block library. It is called The Old Homestead. Electric Quilt has a fantastic product. I use it to design all of my quilts. They now have a mini version if you do not want to purchase the full EQ8 version
With EQ8 (or any version) it is very simple to make changes to the blocks so I did some revisions and ended up with this square block. (I always seem to want to make revisions to blocks to make them more my own!)
I liked this version but of course I had to make one more change. Instead of a square block I wanted to make it a rectangle, so I changed it from a 9" block to a 8" x 6" block.

Now the challenge was to find which fabrics I wanted to work with from the ones that Island Batik sent me. I thought about doing bright summer colors, but this block makes me think of being in the woods, so I decided to go with more "woodsy" colors and ended up with these fabrics. They are part of the Autumn's Grace collection. They have wonderful textures, some look like wood.
The next challenge was to see if there was enough fabric (they were fat eighths) to make each block. I always tell my students that you should make a test block before tackling your good fabrics. That way you can make any corrections ahead of time.

I thought the best way to make this block is to paper piece it so I printed out the paper pieced sections from EQ8 and measured all of the sections to see what size pieces to cut out. I don't like a lot of waste in my fabric (especially since I only had a fat eighth). I wrote down all of the sizes on my foundation paper. These were the pre-cut sizes.
I then added 1" (the 1/2" seam plus an extra 1/2") to each measurement and wrote them down on a sheet of paper as to how many I needed to cut out. That way if they were the same width I could cut out a strip and cut multiple pieces from the strip. Tip: Always cut out the longest strips first, then use the remainder for cutting out smaller strips. It makes the best use of the fabric.

The next step was to cut out the pieces. The foundation sections were tinted so I knew which patches were for the dark fabric and which were for the light fabric. I didn't want to cut into the actual fabrics I chose, so I picked a different fat eighth.. I also labeled each piece with the corresponding section and measurement. I go lucky! I was able to get all of the pieces I needed from that fat eighth with just a tiny bit left over. Good thing I didn't do a bigger block.


The biggest challenge with paper piecing is sewing on triangles. It doesn't work well when you use a square or rectangle so the best thing to do is cut out a triangle that matches the one on the paper plus your 1" extra. I realized I hadn't done that so my rectangles I cut for the triangle patches had to be re-cut into oversized triangles.

I then made the four sections. I use a freezer paper method of paper piecing so I don't have to tear off paper when I am done and can reuse the paper. I will show how I to do this in the next blog. Some of the seams I had to trim to 1/8" (the thin section of light fabric). Here are the four sections trimmed after sewing.
At this point the freezer paper is still on the fabric so I will take it off. Then I can see if some of my final seams need to be pressed in a different direction to make it go together easier. (Another good reason to use freezer paper.)

Now you know how my brain works. Sometimes I don't really know how it works! Be sure to come back for the next installment.

Check out the Island Batik Facebook page for more great quilters' challenges.

As always: Do what you love and love what you do. Thanks for reading a feel free to share.

Fat Quarter Shop Basic of the Month Sale

CreateForLess.com - Create More, Spend Less

Up To 60% Off Hundreds Of Classes at Craftsy.com 4/6-4/8/18. No coupon needed.


Clever Curves: Piecing Techniques - $19.99

from: Craftsy