Search This Blog

Showing posts with label #tutorial. Show all posts

Thursday, August 30, 2018

Hearth and Home Block of the Month - Month 1

I design my quilts in EQ!


I frequently work with many of the fabric companies designing quilts to go with their new fabric collections. RJR is one of those companies that I do a lot of commission work for. They always have such beautiful fabrics that are easy to design with. In the beginning of the year they sent me a fabric collection called Family Roots which I immediately started playing with on my EQ8. I had been doing some sampler quilts with some previous companies (Soldier's Quilt) and collections so I thought I would try to do another one. I came upon with this concept. I love using log cabins in quilts and felt that this was an unusual setting that was different than other BOMs that I have seen.

RJR liked it and submitted the design to Missouri Star Quilt Company. They liked it too! So they picked it up and are selling it on their website. It is a nine month series and Missouri Star will be selling the kits each month for the next nine months. There are 13 fabrics in the quilt. Two of them come from a different fabric collection called Falls Majesty. You can purchase the first month's kit here: Hearth and Home BOM.

Each month you will receive the fabric in fat eighths, fat quarters or regular yardage to make the block(s) for that month. The pattern will include instructions for each block. To save me from having to print too many pages, I have designed cutting charts for each of the fabrics in pdf form. To receive the cutting charts you can use the contact form on this page to request them.

Each month I will be doing a short tutorial on piecing one or more of the blocks. If there is more than one technique that I will be discussing, I will divide it up into two or three separate tutorials. I will not be discussing cutting instructions or specific block piecing instructions. Those are in the pattern and you will have to purchase it with the kit if you want to make it.

To start off, before I talk about the blocks, I think it is important to discuss your 1/4" seam allowance. If you have not seen my Youtube video yet, here it is on how to establish an accurate 1/4" seam.


Because most of these blocks have numerous pieces, accuracy is very important. I always set my seam and make a test block with my own fabric. (You don't want to cut up the good fabric yet!) Measure each section for accuracy. It is easier to make adjustments at this level before sewing the parts together. Once you get that established you don't have to make any more test blocks. If you want to purchase my seam guide you can find it here: Perfect 1/4" Seam Guide.

Month 1 includes Blocks 1 and 2 and the connecting block (log cabin).


Block 1 has no special instructions. It is basically made of half-square and quarter square triangles sewn together. Just be sure to size up each section to the specifications of the pattern.

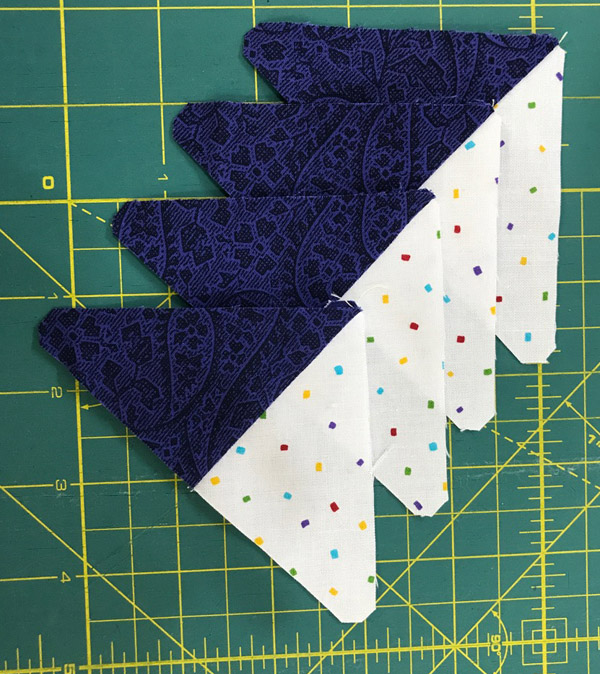
Block 2 has Half-Square triangles and Chevrons. The squares for the half-square triangles are cut slightly larger than needed so that once you piece them you can trim the patches down to size. You can either draw a line on the backs of the lighter fabric, sew 1/4" on each side of the line, cut apart and then trim the square to the size listed, or just cut them into triangles, sew them together and then trim it to the size listed. Don't be afraid of sewing on the bias. Just let the sewing machine do it's job and don't stretch the edge as you sew. I always add a pin at the end of the triangle so that the edges stay together when I sew it.

The Chevron patch is made with squares and rectangles. Again you can draw a line on the backs of the squares, sew on the line and then trim the seam to 1/4" or you can use my "Cutting Corners" template set to trim the corners and then sew with a 1/4" seam allowance. You can purchase my Cutting Corners template set here: Cutting Corners. It can be used a lot with the blocks in this quilt. 


I'll save tips for the log cabin connecting block for the next blog. 


DRAWING

As an introduction to this quilt I will be having a drawing for some fat eighths of the collection. If you would like to be in the drawing simply leave a comment at the end of this blog. You do not have to purchase the BOM kit to be in the drawing but you don't want to miss out on making this fantastic quilt! I will draw a name on September 2. Good luck.

As always, do what you love and love what you do. Thank you for reading and be sure to share this with your quilting friends. Toby.


Saturday, February 3, 2018

STATE BLOCK CHALLENGE HAWAII BLOCK 1

Well the groundhog did not see his shadow on Friday so that tells us there will be six more weeks of winter. Just gives me more excuses to stay inside and quilt! 

The first two blocks from Georgia were send to me by Jeannie S. Way to go Jeannie!

  
After making Georgia blocks 1 and 2 and writing the directions, I decided to devote each blog to writing the directions for one at a time. It makes for not so long of a blog and you can concentrate on making the blocks one at a time. If you want to make only one but aren't sure which one you want to make, then you can wait to see the next one which I will post in a couple days.

Both Hawaii blocks have quite a few pieces in them. It is difficult to say which one was harder. Block two has more odd shapes, but sewing either of them together is not difficult. Today's block has 65 pieces! With all of those pieces I can't stress how important that accurate 1/4" seam is. If you struggle with that consistent seam and you don't have my "Perfect 1/4" Seam Guide" then you might want to think about purchasing it. I have a Youtube video on how to use it. If you haven't seen it yet you can view it here:


Also since all of these blocks are 12" finished blocks, you can use Marti Michell's Template sets A and B for some of the shapes. I also carry those on my website. Set A / Set B. If I use them with any of the blocks I will tell you which ones work with the block.

Hawaii block 1 looks like this without fussy cutting the pieces.


Here are the fabrics I picked for the block.


Here are the templates I made (or used Marti Michell's). Remember to draw a center line on the ones that you want to use for fussy cutting. If you don't want to make templates for the triangles or squares, you can use the patch size cutting instructions.


Here are all the patches cut out!


BLOCK CUTTING INSTRUCTIONS. (QST=quarter-square triangles, HST=half-square triangles) Marti Michell templates = MM. When cutting the HST or QST be sure to follow the straight-of-grain line on the templates.

Fabric 1 Main Print
* Fussy cut four (4) Template G (MM A3)
* Fussy cut one (1) Template H (MM B10)
Fabric 2 Light
* Cut eight (8) Template C or cut two (2) 4-1/4" squares and sub-cut twice diagonally into eight (8) QST.
* Cut eight (8) Template B (MM D29) or cut four (4) 1-7/8" squares and sub-cut once diagonally into eight (8) HST.
Fabric 3 Light blue
* Cut eight (8) Template C or cut two (2) 4-1/4" squares and sub-cut twice diagonally into eight (8) QST.
* Cut eight (8) Template A (MM B12) or cut eight (8) 2-1/2" squares.
* Cut four (4) Template F (MM B14) or cut one (1) 3-1/4" square and sub-cut twice diagonally into four (4) QST.
Fabric 4 Dark purple
* Cut eight (8) Template C or cut two (2) 4-1/4" squares and sub-cut twice diagonally into eight (8) QST.
* Cut eight (8) Template F or cut two (2) 3-1/4" square and sub-cut twice diagonally into eight (8) QST.
Fabric 5 Red
* With fabric folded wrong sides together cut four (4) Template D. You will get a right and left section at the same time.
* With fabric folded wrong sides together cut four (4) Template E. You will get a right and left section at the same time.

PIECING INSTRUCTIONS

Corner units
Step 1. Sew a Fabric 2 Template B HST to each diagonal corner of both Template D and Template E patches. Press to red. You should have 4 right and 4 left of Template D and Template E sections.


Step 2. Sew the pieced Template E patches to the sides of the Fabric 3 Template A squares as illustrated. Press to squares.
 

Step 3. Sew the pieced Template D patches to the other side of the squares as illustrated. Press to Template D. They should equal 3-1/2" square.


Edge units
Step 4. Sew a Fabric 3 Template C QST and Fabric 4 Template C QST together. Press to Fabric 4. Make 4. 


Step 5. Sew a Fabric 2 Template C QST and Fabric 3 Template C QST to each side of a Fabric 1 Template G. Make sure to make the fussy cut piece facing in the correct direction. Press to Fabric 1. Make 4.


Step 6. Sew Sew a Fabric 1 Template C QST and Fabric 4 Template C QST together. Press to Fabric 4. Make 4. 


Step 7. Sew the units together, matching seams. Make 4. The unit should equal 3-1/2" x 6-1/2".


Center unit
Step 8. Sew a Fabric 4 Template F QST to each side of a Fabric 3 Template A square. Press to Fabric 4. Make 4.


Step 9. Sew a Fabric 3 Template F QST to each side of the pieced unit from step 8. Press to Fabric 3. Make 2.


Step 10. Sew the units from step 8 to each side of the Fabric 1 Template H square. Press to fabric 1.


Step 11. Sew the units from step 9 to each side. Press to corner units.The center unit should equal 6-1/2" square.


Putting sections together
Step 12. Layout the 4 Corner units, 4 Edge units and Center unit together as shown. Sew across each row. Press rows 1 and 3 to corners and row 2 to center. Sew rows together. Press seams out.


Here is the link to the templates. Hawaii block 1.

As always: Do what you love and love what you do. Feel free to share this blog with your friends and please leave a comment if you like it. If you have any questions about the directions or if I made a mistake, use my contact form to let me know. Thanks for reading. Toby 

Friday, January 26, 2018

QUILTED BOXY BAG TUTORIAL

I'm not one for currently making things other than quilts (if you have read my background you know that I have tried almost every craft imaginable) but occasionally I do like to learn to make other things. I have made one purse and a couple fabric bowls within the last couple of years. I do it, not because I necessarily want or need it, but because I like to try to make most things at least once. (Then if I like it I will make it again.)

I have all of these 1 yard prints that I purchased to sell on my website. They weren't flat folds, but ends of collections that the fabric company (P&B Textiles) wanted to sell to quilt shops as a bargain. I sell them for $5 each and I have sold quite a few at my local quilt guild meeting. But I still have a lot left. I was trying to figure out how to use some of them plus come up with a class to teach locally so I did a search for quilted bags on the internet. I watched a couple Youtube videos and decided that I would try it. The videos I watch used inexpensive place mats purchased at WalMart or Target and looked quick and easy.

Since I wanted to use the fabric I had, I had to figure what was the best use of a yard of fabric and how many bags I could get from one yard. Regular place mats are about 14" x 19" so I decided that if I made them out of 14" x 18" I could get 6 bags from each yard. I would need two yards, one for the outside and one for the lining.

My first attempt to make the bag ended in something that did not look like what it was suppose to be. It ended up flat! It was suppose to be a box shape! After I realized that I had sewn the corners wrong, I though if I unsewed them and sewed them the correct way it would be fixed. WRONG! Because I had already trimmed the corners they could not be resewn the correct way. This bag will just have to remain flat. I can use it as a cosmetic bag when I travel.

So... to start again. The first bag you can see I did just some straight line quilting on it. So I thought, this next one I will try to do some free motion quilting on my new Janome machine. Since I do all of my quilting on my A-1 longarm machine, I am more accustomed to moving the machine, not the quilt. Moving the machine for me is like holding a pencil. I have no trouble doodling on the longarm. Quilting on a domestic machine is, however, a whole different motion. I took a class on quilting with my domestic machine from Ricky Tims years ago when I first started quilting. He made it look so easy. I thought that since I was having problems mastering it, it was because of my sewing machine so I asked Ricky to sit down at my machine (at that time it was a Bernina 930) and show me how. Well, I learned it wasn't my machine! He just floated along and quilted beautiful feathers and such on MY machine. So much for that excuse.

So this next bag I did try free motion quilting on it. Not being used to the foot pedal speed and the speed of moving my quilt top I struggled to try to get my stitches even and use a smooth movement with my hands. Neither worked. Of course I hadn't had any practice doing it for a long time, so I really shouldn't have expected too much. Here is my attempt at stippling on my second bag. (It looks like what a kindergardener's handwriting looks like when they are learning to write!)


I think I will stick with straight line stitching on my domestic machine! If I want to quilt them quickly I can put the two yard pieces together on my longarm, quilt the whole piece and then cut them up into the sizes I want for my bags. (I like that option the best.) These bags make fast and easy gifts or something to sell at quilt shows or craft fairs.

So here is what you need and how to make the boxy bag.
Materials:
2 fabric pieces cut into 14" x 18".
1 piece of batting (any kind works, the thinner the better) cut at 15" x 19".
Matching thread for sewing and an optional decorative thread for overcast and quilting.
16" nylon zipper to match the fabric.
10" grosgrain ribbon to match the fabric. (optional)
Zipper foot, regular foot, and overcast foot if you have one.

Construction
1. Layer lining, batting and top fabrics so that the wrong side of both fabrics touch the batting.
2. Quilt the layers as desired.
3. Trim the quilted piece so that it is squared up. No batting should show. You will probably end up with a 13-1/2" x 17-1/2" piece or slightly smaller.
4. Finish off the two short edges of the piece with some type of overcast or decorative stitch. If you have a a serger machine you can use it to finish off the edges.
5. Center your zipper, right side of zipper facing wrong side of finished edge, and using your zipper foot, sew one side of the zipper on the quilt. I double sewed it (two stitching lines on top of each other) to hold it together better.


6. Lining up the two edges of the quilt, pin the other side of the zipper to hold it on the quilt. Unzip the zipper all the way and sew the other side of the zipper on.


7. Turn the quilt inside out and flatten it to make sure that the zipper is in the center of both sides. I measured from the edge of the zipper to the folded edge on both sides and made adjustments if they were not even. You could also mark the center of the quilt and line up the zipper on top of the center line. (In the photo I had trimmed the end, not the top, of the zipper before sewing. You can do it now or after you sew the seam.) Sew this side with a 3/8" seam reinforcing the stitching over the zipper. (If you want to put in some loops on each end you can do it at this point. Cut the ribbon into two 5" pieces. Fold them in half and place them on top of the zipper between the outside piece and the zipper, with the ends of the ribbon even with the edges of the quilt. The loop will be inside of the quilt.You can make bigger loops if you want, just cut the ribbon longer.)


8. Open the zipper half way. Match the open sides of the zipper, (this is the side with the pull) holding it together and pin it. Sew this end with a 3/8" seam, keeping the zipper as close together as possible and reinforcing the stitches over the zipper.  Cut off ends of zipper that go past the seams.


9. Here is the place where I made my mistake. Fold one of the corners so that the seam is in the middle and it creates a point. You can measure both sides from the seam to make sure you folded it in half accurately. (Don't worry if it is not perfect. That is the great thing about this boxy bag. It looks good not matter what you do!)

10. Using some type of triangle ruler, line it up at 2" along the two edges as illustrated and draw a line along the ruler's edge. You can make the measurement smaller (2" or 1-1/2") if you want the bag to be a little shorter and longer. The first one I marked at 2-1/2" this one I marked at 2".  Repeat this on all 4 corners. Put in a couple pins just to hold the folded corners.


11. Sew along the drawn line keeping seams open.


12. Trim off the corners to about 3/8" from the seam. Trim off the two corners a little to make turning it easier.


13. Turn your bag right side out and push out the corners. Here are my two bags side to side so you can see the slight difference in the height and length.


Of course if you don't want to make your own quilt sandwich, you can certainly use a place mat. Try not to get one that is too stiff or it will make it hard to sew through all of the seams at the corners.

Well I hope you have learned enough to try to make your own bag. Play with different sizes of fabrics and heights. You could even make a small one for a change bag in your purse! I'd love to see what you come up with. Feel free to leave a comment if you need any clarification of my directions or if you can think of something that I left out that you think I should add.

As always: Do what you love and love what you do. Thanks for reading. Toby Lischko