Search This Blog

Showing posts with label #quilting. Show all posts

Thursday, January 17, 2019

ISLAND BATIK AMBASSADOR BLOG HOP


This blog hop's theme is Getaway. Since I don't do appliqué or theme quilts very well I decided to say that making this quilt was a journey for me. The journey involved designing the quilt.

I was given the fabric collection (of course from Island Batiks) called Soul Song. It was in my surprise package that I wasn't able to use until now. The collection was unusual in that it had two completely different looks. Ten of the fabrics were small dots in all different colors and ten were tans and blacks with geometric shapes on them. What do I do with two fabrics that to me didn't go together at all even though they were in the same collection?

Here is a sampling of what the fabrics looked like.


I started like I usually do and open EQ8 and think about doing a log cabin block. Being rushed for time, I decided that I didn't have time to make a lap size quilt of log cabins. So I did something I haven't done before. I made it up as I went a long!

Luck would have it that I received a wonderful package from FedEx labeled Accuquilt that same week. I found out that Accuquilt graciously gave the ambassadors an Accuquilt Go 


with some dies! Perfect timing! In that package was a die for 2-1/2" strips. I also had a die for 1", 1-1/2" and 2" strips so I decided to use my new toy to cut strips. I cut the tan and black strips with the smaller die and the colored strips with the 2-1/2" die.


I then cut them into sections. The fastest way to cut a lot of different strips is to line them up and cut them all at the same size. (I had to use two rulers to get the size I wanted. I don't use my mat to measure.)


I thought maybe a type of Rail Fence quilt would work so I sewed them together alternating the colored fabrics and tan fabrics.


I then laid a few of the blocks out in a Rail Fence design and stood back and looked at it.


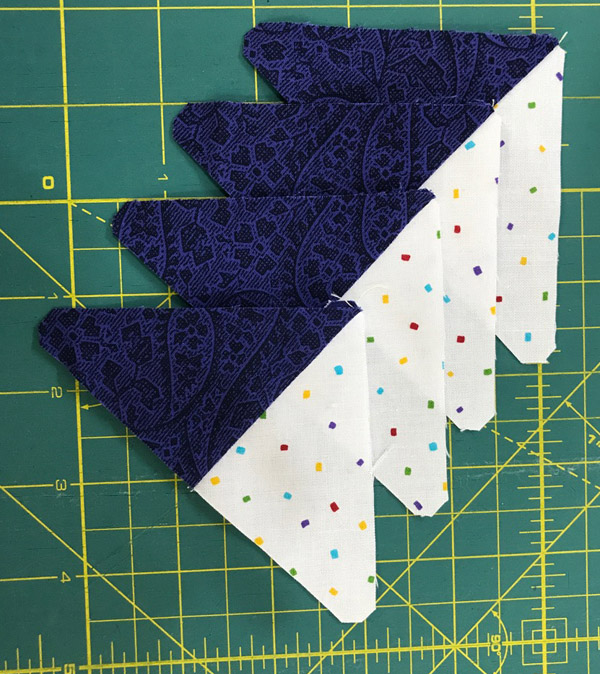
Too boring! So I decided to cut them in half diagonally.


Now the tricky part. How do I cut the second piece so that they fit together? It took me a couple tries but finally figured it out. (Luckily I was able to use the ones that I cut wrong since there are only a couple different ways to cut them.)


I put them together. I liked the look but decided that I didn't want to take the time to match all of those seams!


So I cut a thin strip of one of the fabrics in the collection that I hadn't used yet to put in the middle of the block. Now I was happy with the block! 


So I continued with all of the strips and laid it out on my design wall.


I decided that a border was not necessary so I pieced the backing with my leftover fabrics, 


used some wonderful Hobbs Tuscany Cotton/Wool batting, 


that was given to me in my Island Batik box, and put it on my quilting machine. That is where I am right now since I had to get this blog out! Have to figure out how to quilt it now (the hardest part for me). Any suggestions? I always start by quilting in the ditch (with the Aurifil Monofilament thread that I was also given) on each side of the diagonal strips. I'm thinking some type of curves since the quilt lines are all straight.


I was pretty pleased with myself! Not only did I design something that I had no idea what it would look like when I finished but also that I made a scrappy quilt (which is hard for me since I am so predictable and uptight about knowing what my finished project should look like). 

Well as usual I am late getting this out, which has been a pattern for me lately.

I will be having a give away of five fat eighths of some Island Batik fabrics (not from this collection since I used most of it). If you want to be in the drawing be sure to leave a comment and your email address so I can contact you if you win. Also if you have any suggestions for quilting this let me know and if you are interested in a pattern on how to make this quilt with the measurements I would like to know that too. I will be choosing a winner when the blog concludes in the first week in February.


Be sure to follow all of the other Ambassadors blogs on the collections that they received and enter the drawing from Island Batik's blog for 20 FAT QUARTERS!

ISLAND BATIK GIVEAWAY

As always: Do what you love and love what you do. Thanks for reading and please share with your quilting friends.

WEEK 1
Monday, January 7 - Crystal Ball


Tuesday, January 8  - Ditty


Wednesday, January 9 - Elk Lodge


Thursday, January 10 - Feline Fine


Friday, January 11 - Flea Market


WEEK 2
Monday, January 14 - Fortune Teller
Jennifer Fulton- The Inquiring Quilter


Tuesday, January 15  - Gypsy Rose


Wednesday, January 16 - Paisley Park


Thursday, January 17 - Soul Song


Friday, January 18 - Twilight Chic


WEEK 3
Monday, January 21 - Winter Park


Tuesday, January 22  - Bazaar


Wednesday, January 23 - Blossom


Thursday, January 24 - Boho


Friday, January 25 - Brookview


WEEK 4
Monday, January 28 - French Blue


Tuesday, January 29  - Midsummer Night


Wednesday, January 30 - Oh Deer


Thursday, January 31 - Snow Berry  


Friday, February 1-  Candy Cane Lane and Icicle
Anne Wiens- Icicle - Sweetgrass Creative Designs


Barbara Gaddy - Candy Cane Lane  -Bejeweled Quilts by Barb

Saturday, February 3, 2018

STATE BLOCK CHALLENGE HAWAII BLOCK 1

Well the groundhog did not see his shadow on Friday so that tells us there will be six more weeks of winter. Just gives me more excuses to stay inside and quilt! 

The first two blocks from Georgia were send to me by Jeannie S. Way to go Jeannie!

  
After making Georgia blocks 1 and 2 and writing the directions, I decided to devote each blog to writing the directions for one at a time. It makes for not so long of a blog and you can concentrate on making the blocks one at a time. If you want to make only one but aren't sure which one you want to make, then you can wait to see the next one which I will post in a couple days.

Both Hawaii blocks have quite a few pieces in them. It is difficult to say which one was harder. Block two has more odd shapes, but sewing either of them together is not difficult. Today's block has 65 pieces! With all of those pieces I can't stress how important that accurate 1/4" seam is. If you struggle with that consistent seam and you don't have my "Perfect 1/4" Seam Guide" then you might want to think about purchasing it. I have a Youtube video on how to use it. If you haven't seen it yet you can view it here:


Also since all of these blocks are 12" finished blocks, you can use Marti Michell's Template sets A and B for some of the shapes. I also carry those on my website. Set A / Set B. If I use them with any of the blocks I will tell you which ones work with the block.

Hawaii block 1 looks like this without fussy cutting the pieces.


Here are the fabrics I picked for the block.


Here are the templates I made (or used Marti Michell's). Remember to draw a center line on the ones that you want to use for fussy cutting. If you don't want to make templates for the triangles or squares, you can use the patch size cutting instructions.


Here are all the patches cut out!


BLOCK CUTTING INSTRUCTIONS. (QST=quarter-square triangles, HST=half-square triangles) Marti Michell templates = MM. When cutting the HST or QST be sure to follow the straight-of-grain line on the templates.

Fabric 1 Main Print
* Fussy cut four (4) Template G (MM A3)
* Fussy cut one (1) Template H (MM B10)
Fabric 2 Light
* Cut eight (8) Template C or cut two (2) 4-1/4" squares and sub-cut twice diagonally into eight (8) QST.
* Cut eight (8) Template B (MM D29) or cut four (4) 1-7/8" squares and sub-cut once diagonally into eight (8) HST.
Fabric 3 Light blue
* Cut eight (8) Template C or cut two (2) 4-1/4" squares and sub-cut twice diagonally into eight (8) QST.
* Cut eight (8) Template A (MM B12) or cut eight (8) 2-1/2" squares.
* Cut four (4) Template F (MM B14) or cut one (1) 3-1/4" square and sub-cut twice diagonally into four (4) QST.
Fabric 4 Dark purple
* Cut eight (8) Template C or cut two (2) 4-1/4" squares and sub-cut twice diagonally into eight (8) QST.
* Cut eight (8) Template F or cut two (2) 3-1/4" square and sub-cut twice diagonally into eight (8) QST.
Fabric 5 Red
* With fabric folded wrong sides together cut four (4) Template D. You will get a right and left section at the same time.
* With fabric folded wrong sides together cut four (4) Template E. You will get a right and left section at the same time.

PIECING INSTRUCTIONS

Corner units
Step 1. Sew a Fabric 2 Template B HST to each diagonal corner of both Template D and Template E patches. Press to red. You should have 4 right and 4 left of Template D and Template E sections.


Step 2. Sew the pieced Template E patches to the sides of the Fabric 3 Template A squares as illustrated. Press to squares.
 

Step 3. Sew the pieced Template D patches to the other side of the squares as illustrated. Press to Template D. They should equal 3-1/2" square.


Edge units
Step 4. Sew a Fabric 3 Template C QST and Fabric 4 Template C QST together. Press to Fabric 4. Make 4. 


Step 5. Sew a Fabric 2 Template C QST and Fabric 3 Template C QST to each side of a Fabric 1 Template G. Make sure to make the fussy cut piece facing in the correct direction. Press to Fabric 1. Make 4.


Step 6. Sew Sew a Fabric 1 Template C QST and Fabric 4 Template C QST together. Press to Fabric 4. Make 4. 


Step 7. Sew the units together, matching seams. Make 4. The unit should equal 3-1/2" x 6-1/2".


Center unit
Step 8. Sew a Fabric 4 Template F QST to each side of a Fabric 3 Template A square. Press to Fabric 4. Make 4.


Step 9. Sew a Fabric 3 Template F QST to each side of the pieced unit from step 8. Press to Fabric 3. Make 2.


Step 10. Sew the units from step 8 to each side of the Fabric 1 Template H square. Press to fabric 1.


Step 11. Sew the units from step 9 to each side. Press to corner units.The center unit should equal 6-1/2" square.


Putting sections together
Step 12. Layout the 4 Corner units, 4 Edge units and Center unit together as shown. Sew across each row. Press rows 1 and 3 to corners and row 2 to center. Sew rows together. Press seams out.


Here is the link to the templates. Hawaii block 1.

As always: Do what you love and love what you do. Feel free to share this blog with your friends and please leave a comment if you like it. If you have any questions about the directions or if I made a mistake, use my contact form to let me know. Thanks for reading. Toby