Search This Blog

Monday, December 23, 2019

Eight Days of Chanukah specials


HAPPY CHANUKAH 

(AND MERRY CHRISTMAS)

I can't believe the last blog I wrote was in March! Every year I make a resolution to write in my blog at least once a month if not more and every year I start off great but by March or April I start to wain. Usually because I start getting really busy. I would love to write about the projects I am currently working on but many times I am unable to share them with you because they are projects for a company that I can't share until they come out which might be 6 months down the road!

I know I will make this resolution again and really try to keep it but again, I will probably get busy and lose track of time.

I am writing this message not only to wish all of my friends a wonderful holiday season and happy new year but also to tell you about my 8 days of Chanukah sale. Many businesses do a 12 days of Christmas sale but because Chanukah falls on top of Christmas this year I decided to do something a little different.

When I was a child my parents would give me a present each night of Chanukah. For the first 7 nights it was usually a small gift such as a box of crayons, socks, coloring books and other small things that I would use. The last night we would get a big gift (well not necessarily a BIG gift) of something that we really wanted. I continued that tradition with my own children.

So, each day of Chanukah I will be offering a special on some of my products on my website. It might be patterns, templates or certain fabric. I will be mailing out my newsletter to announce what is on sale for that day so be sure to go to my website to sign up for my newsletter.

The first special starts tonight at midnight and goes until tomorrow night at midnight. I will be offering all of my in stock templates at 40% off! All you have to do is write "templates" in the coupon box for the discount when checking out.

This would be a great time to get those templates that go with either of my classes; Clever Curves in Bluprint or Kaleidostars at iQuilt. Also if you order any of my Kaleidostars templates you will get my book Kaleidostars for free!

SOLDIER QUILT BLOCK OF THE MONTH

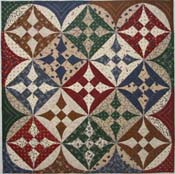
I also want to mention that I will be starting a new Block of the Month at the end of January. This won't be a fussy cut block. It is based on my Soldier's Quilt pattern. The original was made especially for a fabric collection from Washington Street Studio called Soldier's Quilt and the size was for a Civil War cot so it was long and skinny. This quilt is bigger but has the same blocks in it (just more of each). This quilt features a Washington Street Studio fabric collection called Wildflower Woods designed by Evonne Cook. The blocks are 9" and the finished size of the quilt is 65" x 87".


The program is 8 months. The first 7 months you will be making 5 of each of the blocks (there are 7 same blocks and 35 total blocks) each month. The cost is $25 per month (plus shipping) for the first 7 months and $40 (plus shipping) for the last month for the finishing kit which includes the sashing, border and binding. Your kit will start with a notebook to put all of the instructions in. The instructions and fabrics will come in a notebook sleeve to keep everything organized. 

The instructions will also have a cutting chart, to make the best use of your fabrics, and detailed written instructions. I will also be doing a blog on the instructions for tips on different ways to make your blocks.

Here is the first block: The photo of the fabrics doesn't do it justice. They are so much prettier in person.


There are a limited number of kits available so if you are interested don't wait too long to sign up for the first month's installment. Soldier Quilt Block of the Month.

Well I better get sewing. I hope everyone has a wonderful holiday season. Watch for my newsletter for specials all this week and feel free to share that and this blog with all your quilting friends.

As always; do what you love and love what you do. Thanks for reading. Toby Lischko


Monday, March 11, 2019

ISLAND BATIK MAGNIFICENT MINIS


It seems that since the first of the year, I am one step behind! For the February Island Batik Ambassador challenge we were to make a mini. I did start it in February with the purpose of finishing it in February! Well, I came close.

I have made many minis. I went through a period in late 1996-97 making minis because I never could seem to finish larger quilts. I would make quilt tops but quilting them seemed daunting on my domestic machine. I hadn't gotten my longarm yet. Making minis was great because I could finish the top in a short time and quilt and bind it in record time!

Here are some of the minis that I made:

Pennsylvania Star
Pattern and templates available on my website. (Click on link above.)
The first quilt I entered in the Miniatures from the Heart contest in the Miniature Quilt magazine (which is no longer in print). It won a Innovative quilting prize and the Glorified Nine Patch won a first place ribbon in a local quilt show. (The later is one that I teach a lot to quilt guilds.)

 THE CHALLENGE

For this challenge I had lots of small fabric strips left over from the Spring Breeze quilt that I made. (Pattern is available on my website, click on link under image.)
Here are the scrap strips leftover from that quilt.

 
I was thinking since the strips were all about the same size (1") I would do a log cabin block. I have a favorite curved log cabin block that I have used in quite a few patterns and I miniaturized it down to a 2-1/2" finished block in my EQ8 program. Then I printed the paper pieced blocks on freezer paper. Since the block was so small I could print multiple blocks on one page. On a log cabin if you make the strips smaller on one side it creates a curve illusion.

  
Here are some full size quilt I made (patterns available, click on links under image) with the same curved log cabin block.

Here is what the block looked like after I finished it.

Here is what the back looks like. I trimmed the seams to 1/8" since it was so small.

After finishing 16 blocks (I wanted to get it done so I didn't want to make too many blocks) I played with different settings.


Here is the setting I decided to go with.


I thought how do I quilt it? I decided to focus on the curves so I quilted circles. That is not easy on a quilt as small as this! I started with a small circle from the bottom of a pill bottle and then used the edge of my machine foot to follow it for the concentric circles. Sometimes I had to sew two stitches at a time and move the quilt! I quilted it with a light blue Aurifil thread.

I wanted to make the binding scrappy but luckily one of the fabrics I used in the quilt had multiple colors and worked perfectly! For miniature quilts I cut the binding at 1-1/8" and use a single fold. Before I sew it on I press it in half (wrong sides together) and then press the edges to the center for my 1/4" seams. This makes a perfect 1/4" binding.

I hope you enjoyed the process of making my mini. I had fun. My husband helped me name it Bullseye! If you think you would like a pattern of it, please let me know. I will add it to the list of patterns that I have to write.

DRAWING

Congrats to Sharon Aurora who won a fat 1/8th bundle of Island Batik fabrics. Leave a comment and you will be entered into a drawing for a  fat 1/8th bundle of Island Batik fabrics. Be sure to leave your contact information so I can reach you if you won.

As always: Do what you love and love what you do. Thanks for reading and feel free to forward and send to your quilting friends.

Restrictions: One (1) redemption per email address 3/02/2019 12:01AM Mountain Time through 3/13/2018 11:59PM Mountain Time. Subscribers who select a monthly plan will get their first three months at 50% off - USD $3.99/ month. After first three months they will renew at USD $7.99. Subscribers who select an annual plan will be charged USD $79.99 for one year. Monthly subscribers will receive one shop.mybluprint.com own forever class coupon immediately upon subscription. Annual subscribers will receive three shop.mybluprint.com own forever class coupons immediately upon subscription. Coupons will be sent at the start of each quarter amounting to 12 coupons in total. Shop.mybluprint.com own forever class coupons expire at the end of each quarter. Each class coupon can be redeemed for any one class on shop.mybluprint.com with the exception of classes produced by The Great Courses. Offer cannot be combined with other offers, and is not redeemable for cash. Class coupons are only available for subscribers of a Bluprint paid membership. Current or cancelled Bluprint customers are not eligible for this offer. This offer does not include a free trial. Discount cannot be combined with other offers or promotional codes and is not redeemable for cash. Free shipping is only available for orders shipped within the US. Subject to additional terms. Bluprint may end or alter this offer at their discretion. 

  Ultimate Quilt Package - Free Quilt Kit + 12 FREE Own-Forever Classes With Annual Bluprint Subscription through 3/13/19 at myBluprint.com.Restrictions: One (1) redemption per email address 3/02/2019 12:01AM Mountain Time through 3/13/2018 11:59PM Mountain Time. Instructions for redeeming your kit will be sent via email upon purchase of the Ultimate Quilt Package. Free kit must be redeemed on or before 4/16/2019 at 11:59PM Mountain Time and unredeemed kits cannot be redeemed for any other product or value. While supplies last. Credit/debit card required. Offer cannot be combined with other offers, and is not redeemable for cash. Offer is only available for new annual subscribers of a Bluprint paid membership, which begins immediately upon sign-up. Offer is only available in the U.S. Free shipping is only available in the U.S. No free trial is available with this special offer. You can cancel at any time, but your annual subscription will remain active for the full year and prorated refunds will not be offered. Offer cannot be combined with other offers, and is not redeemable for cash. Current Craftsy Unlimited and current Bluprint customers are not eligible for this offer. Subject to additional terms. Bluprint and Craftsy may end or alter this offer at their discretion.

Sunday, February 17, 2019

NATIONAL QUILTER'S CIRCLE MYSTERY WEEK 2

BLOCKS 2 AND 3


Don't sew when you are tired!

I was recently diagnosed with Fibromyagia. Those who are not familiar with the disease, some of the symptoms are fatigue and Fibro-Fog. You know what the first one means, the second symptom means what it sounds like. I am constantly in a fog. I forget things easily (walk into a room and forget what I went there for, well some of that can be due to age!), I get easily distracted, I forget what someone tells me seconds after they tell me, and it is difficult to concentrate. I know some of you will tell me that you have those too if you are over 65! 

The other symptom (fatigue) causes me to be tired all the time. I can fall asleep anywhere; in front of my computer, my sewing machine, and the tv. I could sleep 12 hours and still be tired. There are other symptoms but they are being somewhat controlled with medication.

I started the day getting up early for an eye appointment. I had planned when I got home to work on a couple new versions of block 2. I had felt tired even when I got up so I knew it was going to be a bad day. Well, when I got home I sat on the couch catching up on emails and I fell asleep. I woke up in time to eat lunch and my husband had some things to do outside so I sat down in front of the tv and fell asleep again! Well this went on all afternoon. Finally I got a chance to sew after dinner.

I will proceed to show you what happened when I tried to sew this block together. I don't mind telling you that I make mistakes when I quilt but these were doozies! 

SEWING BLOCK 2 USING TEMPLATES

I don't have to stress how important it is to have an accurate 1/4" seam allowance when piecing with the templates. Use your best method for getting a consistent 1/4". I talked about how I do it in earlier blogs but just in case you haven't seen it, you can check out my Youtube video. You can purchase my Accurate 1/4" Seam guide here: Seam guide.


When you cut out the pieces, with the templates, make sure you place the correct fabric on top and make sure that the templates are face up. It helps to write the letter of the template and number of the block on the top of the templates.

Lay three of the pieces (right or left side) in the block looking at the image of the block in the instructions. Template B looks like the two opposite sides are the same size but they are actually slightly different. Also A and C are similar, but one is slightly bigger than the other, so be sure to keep them separate with the correct labeled template.
It is easy to get them mixed up, but when you put them next to A or C you will see that the edges do not line up. Here is what I did. 


I looked at it and didn't think it seemed right but the edges of B line up with the edges of A and C so I figured it had to be right. I wanted you to see what it looks like if B is in the wrong direction. Remember, this is suppose to make a right triangle (a triangle with a 90º angle).


So I thought maybe if I sew them together it will look right. So I sewed the 3 pieces together and laid them on the edge of my table. I noticed that the seam dipped at the point but again I thought, maybe sewing the two halves together will fix that. It made a triangle!


So I sewed the two halves together. I knew it definitely didn't look right. It wasn't even square! So I tried to figure out what I did wrong. (I got really friendly with "Jack".)


As I said, my brain is constantly in a fog so, I really couldn't figure out what I was doing wrong. I was looking at the image of the block (was I seeing it correctly?) and my pieces and I was getting very frustrated! So my last resort was to get out the paper pieced section and place my pieces on top of it. The light bulb went on! I was placing the B template backwards! That's why the edges still matched.


To make sure that I was piecing it correctly from this point forward, I folded down A on top of B, pinned and sewed them together.


I laid it back onto the paper and then folded it down over C, pinned and sewed them together.


I repeated with the other half.


Then I could chain stitch the other sections to make it go faster. Make sure you piece from A to C pressing to C on the right side and from C to A pressing to A on the left side.

Here are some images for sewing the pieces together and where to match the tops, bottoms, and seams. The templates are made so that there is very little guessing when laying the pieces together. When matching seams I like to pull one side back to see if they match and then I pin on two sides.


MATCHING SEAMS


MATCHING POINTS


MATCHING CENTERS


Remember, the A piece is on the OUTSIDE of the block.

THIS


NOT THIS


I know they look similar but the A piece is skinnier than the C piece in this block. Isn't it amazing how everything works together when you put the pieces in the right direction! Here is the finished block.


Of course I had to fussy cut it. Not sure how much I like it. It will look better on-point.


Block 3 is very similar to block 1. The C template is a little skinnier and longer than the A template. Be sure to keep them separate and labeled. Here are some tips when piecing to check to see if you are placing the patches together correctly and your 1/4" seam is accurate.

Check your edges after you sew. They should be straight.


And you should have a nice 1/4" seam allowance at the point.


Here is one quarter of the block. A is on the top and left side. C is in the center. You can see that the C on this block is very close in size to the A but it is longer and skinnier.


Here is my finished second version of block 3. I used some of my own dyed fabrics that I dyed over 20 years ago!


I haven't fussy cut it yet. But will post it when I do.

DRAWING WINNER

Congratulations to Robin Boehler! She won a batik bundle for leaving a comment. She said "Thank you Toby for sharing your design and your expertise." I will be giving away another bundle of batiks, so be sure to leave a comment and some way of contacting you (your email would be best). If you don't and I draw your name you will miss out on a prize. 

I hope you get a chance to check out my website. I always have great deals on fabrics and I have some new kits and patterns. I will be posting the batiks used in my original design if there are any left over after this last shipment. I appreciate that you all have been so patient in getting the kits. They should all go out this week. Also if you belong to a quilt guild, I love to travel and teach. Feel free to pass on my information to your program chairperson.


As always: Do what you love and love what you do.


Saturday, February 9, 2019

NATIONAL QUILTER'S CIRCLE MYSTERY PAPER PIECE BLOCK 1

NATIONAL QUILTER'S CIRCLE

MYSTERY PAPER PIECED

BLOCK 1


I just love quilters! What makes life so interesting is that everyone has different tastes in fabrics and colors and we are all so versatile. Seeing block 1 come to life with all the wonderful variations is so fun! Also some quilters put their blocks together differently (I don't think on purpose) but the end results are fantastic! Need the instructions you can click on BLOCK 1 and the link will take you there. If you haven't signed up for it yet, please do so you don't miss any of the instructions!

What I want to demonstrate today is how I paper piece with freezer paper. (Can't find freezer paper, I have it on my website: Freezer paper.) I have heard many comments that there is so much waste in paper piecing that quilters don't like to do it but when I show you how I use the templates to cut out my pieces you will see that there is very little waste.

If you have not done the block yet, you need to downloaded the updated corrected block 1 templates and foundation sections. If you have already made it, then you don't need to bother doing that. You can find the file under Links on the Facebook page or get it here.

First make your templates out of heavy weight plastic. It just lasts longer than the thin stuff and you can purchase it at JoAnn's or Michaels. You can also use heavy cardboard. If you use cardboard I suggest you line up your ruler along the edges so you don't cut into them. To make the templates, just cut slightly around the outside edges of them and tape them to your template material. Then cut out along the outside edge exactly making sure you trim all the little corners.

Lay your fabrics wrong sides together. I have in the instructions which fabric should be on top when cutting out so that you have the correct A or Ar (B or Br and C or Cr). The r just stands for the reverse of the original. Since I have batiks there is no really visible right or wrong sides so I can cut them with the same fabric on top. If you are not using batiks be SURE to put the correct fabric on top before cutting out. I left some space between each of the templates so I can add a 1/4" all the way around them.


Now I take my Add-a-quarter ruler and add 1/4" around the entire template as I cut the pieces out. You end up with a piece that is 1/2" bigger than the original. That gives you plenty of "play" room to cover the area that you are paper piecing. (If you want to cut the sections even larger than that, go ahead. Do what you feel comfortable doing to get it to work for you.)


Now you are ready to start sewing. I have a little mantra (a phrase that I repeat over and over) when I am paper piecing. It goes like this (this is also in the pattern): PRESS, FOLD, TRIM, SEW. It helps me get into a rhythm when I am paper piecing.

My first printing of the freezer paper did not include the shading so I made sure I wrote dark or light on my sections so I would not get confused. Instructions for printing on the freezer paper are in the pattern. (Be sure to check your printout with the 1" box on the page so that your scale is correct.) Cut out the left and right sections close to the outside line. I do not cut right on the line. 


Following the color placement (dark or light):

1. PRESS the WRONG side of the fabric (template A) to the SHINY side of the freezer paper. Your iron needs to be hot enough to slightly melt the wax but not too hot to make it difficult to remove. Test your iron to get the right setting. You should only need to leave it on the paper for a few seconds. Just press to the line between 1 and 2.

You should be able to see the fabric all the way around the outside edges and your inside edge is overlapping the seam line (solid line) by more than 1/4". The outside edges will be trimmed at the end. Be sure to always start with #1 on each section as #1 is on the bottom on one section and on the top on the other so that the seams are pressed in opposite directions.


2. I usually use a business card, but these are long stitching lines so I just use one of the templates and line it up along the line between 1 and 2. I want to see the line. The section with the fabric should be on your left (well for right handed people it is) and FOLD back the paper along that line. Make sure that it is folded exactly on that line.


3. TRIM your seam to 1/4" using the Add-a-quarter or a small ruler with a 1/4" line. The Add-a-quarter ruler has a little ledge on it and it stops at the fold of the paper so you can get an accurate cut. Can't find one in your area, you can purchase one on my website. I also carry Add-an-Eighth. Add-a-Quarter. Don't worry that the pointed edge does not go all the way down. It will be covered by the next fabric. 


4. Place your next fabric (template B) right sides together, first checking to make sure that you have the template B section in the right direction. You can see through the freezer paper and can see the direction of the point of the triangle. 


5. Line up the edge of B with the cut edge of A. Make sure that you can see your B fabric sticking out from the top and bottom of the paper. Now you are ready to SEW. I like to use an open toe foot and move my needle all the way to the right. That way the inside edge of my foot lines up with the fold of the paper. You do not have to change the length of your stitch because you are not sewing on the paper. You will sew as close to the paper as you can, starting at the top edge of the paper and sewing all the way to the bottom edge. If you accidentally sew a little on the paper don't worry. It comes out.


6. Finger press your seam then PRESS section B to the freezer paper only to the line between 2 and 3 with the iron. I always press on the paper side. Now repeat the process. You just pressed, so FOLD the paper along the line between 2 and 3 with your template edge. TRIM your seam to 1/4". Line up the edges of B and C right sides together, making sure you have fabric sticking out on the top and bottom and that it is facing in the correct direction and SEW along the fold.


Here is a little tip. If you have light and dark fabrics and don't want the dark to show through your seam on the front, place the light fabric slightly beyond the dark edge. This way the dark is hiding behind the light and won't show through the front of your block.


I give it one last press to the freezer paper and then trim my section. I don't use the outside lines. I line up the 1/4" line of my ruler on the seam line on the freezer paper. That way if the outside line is off just a little I know I will have an exact 1/4" seam. (Here are both sections done. You can see that the fabric sticks out all the way around the paper.)


Now you can remove the freezer paper. Be careful and slowly peel it off in the direction the seams are going in so you don't pull on the seams. If it is a little difficult to get off, use your iron to warm it up just a little. Now you can reuse the freezer paper. Since you have already folded it along the lines you do not need to use the template to line it up on the lines anymore. I have found that I can reuse my freezer paper up to 6 to 8 times if my fabric isn't too linty or my iron wasn't too hot. Now they are ready to sew together.


I particularly like this method because I do not like to tear paper off at the end, especially when it is a large quilt. I know some quilters have told me that they find it relaxing to tear off the paper. To each his own!!!

LIKE TO FUSSY CUT?

If you know me, you know I love to fussy cut so I had to play with this block and some of my new Paula Nadelstern fabrics I carry in my store. This one is called Rabbit Hole from her More is More collection and the pink and blue are her blenders. You see I laid out the fabrics a little different. Not on purpose, but I like the way it came out (and I didn't want to recut anything! To do this I had to use the templates and not paper piece it. You can see Paula's fabrics on my website here: Nadelstern fabrics. If you purchase any of her fabrics and mention you saw it on my blog in the comment section when checking out I will give you 10% off your fabric purchase (on the Nadelstern fabrics)!


FABRIC DRAWING


Well I know the NQC quilters are anxious to read my blog so I will get this posted. If you have any questions, don't hesitate to ask. Leave a comment and I will put your name in a drawing for some of the Timeless Treasures batiks I am using for this quilt! Be sure to give me some way to contact you if you won.

Remember: Always do what you love and love what you do. 

HAVE FUN AND SEE YOU ON THE NATIONAL QUILTER'S CIRCLE FACEBOOK PAGE. All of these blocks were designed in EQ8.