Search This Blog

Showing posts with label #islandbatikambassador. Show all posts

Monday, March 11, 2019

ISLAND BATIK MAGNIFICENT MINIS


It seems that since the first of the year, I am one step behind! For the February Island Batik Ambassador challenge we were to make a mini. I did start it in February with the purpose of finishing it in February! Well, I came close.

I have made many minis. I went through a period in late 1996-97 making minis because I never could seem to finish larger quilts. I would make quilt tops but quilting them seemed daunting on my domestic machine. I hadn't gotten my longarm yet. Making minis was great because I could finish the top in a short time and quilt and bind it in record time!

Here are some of the minis that I made:

Pennsylvania Star
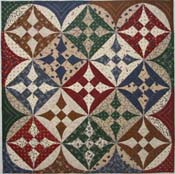
Pattern and templates available on my website. (Click on link above.)
The first quilt I entered in the Miniatures from the Heart contest in the Miniature Quilt magazine (which is no longer in print). It won a Innovative quilting prize and the Glorified Nine Patch won a first place ribbon in a local quilt show. (The later is one that I teach a lot to quilt guilds.)

 THE CHALLENGE

For this challenge I had lots of small fabric strips left over from the Spring Breeze quilt that I made. (Pattern is available on my website, click on link under image.)
Here are the scrap strips leftover from that quilt.

 
I was thinking since the strips were all about the same size (1") I would do a log cabin block. I have a favorite curved log cabin block that I have used in quite a few patterns and I miniaturized it down to a 2-1/2" finished block in my EQ8 program. Then I printed the paper pieced blocks on freezer paper. Since the block was so small I could print multiple blocks on one page. On a log cabin if you make the strips smaller on one side it creates a curve illusion.

  
Here are some full size quilt I made (patterns available, click on links under image) with the same curved log cabin block.

Here is what the block looked like after I finished it.

Here is what the back looks like. I trimmed the seams to 1/8" since it was so small.

After finishing 16 blocks (I wanted to get it done so I didn't want to make too many blocks) I played with different settings.


Here is the setting I decided to go with.


I thought how do I quilt it? I decided to focus on the curves so I quilted circles. That is not easy on a quilt as small as this! I started with a small circle from the bottom of a pill bottle and then used the edge of my machine foot to follow it for the concentric circles. Sometimes I had to sew two stitches at a time and move the quilt! I quilted it with a light blue Aurifil thread.

I wanted to make the binding scrappy but luckily one of the fabrics I used in the quilt had multiple colors and worked perfectly! For miniature quilts I cut the binding at 1-1/8" and use a single fold. Before I sew it on I press it in half (wrong sides together) and then press the edges to the center for my 1/4" seams. This makes a perfect 1/4" binding.

I hope you enjoyed the process of making my mini. I had fun. My husband helped me name it Bullseye! If you think you would like a pattern of it, please let me know. I will add it to the list of patterns that I have to write.

DRAWING

Congrats to Sharon Aurora who won a fat 1/8th bundle of Island Batik fabrics. Leave a comment and you will be entered into a drawing for a  fat 1/8th bundle of Island Batik fabrics. Be sure to leave your contact information so I can reach you if you won.

As always: Do what you love and love what you do. Thanks for reading and feel free to forward and send to your quilting friends.

Restrictions: One (1) redemption per email address 3/02/2019 12:01AM Mountain Time through 3/13/2018 11:59PM Mountain Time. Subscribers who select a monthly plan will get their first three months at 50% off - USD $3.99/ month. After first three months they will renew at USD $7.99. Subscribers who select an annual plan will be charged USD $79.99 for one year. Monthly subscribers will receive one shop.mybluprint.com own forever class coupon immediately upon subscription. Annual subscribers will receive three shop.mybluprint.com own forever class coupons immediately upon subscription. Coupons will be sent at the start of each quarter amounting to 12 coupons in total. Shop.mybluprint.com own forever class coupons expire at the end of each quarter. Each class coupon can be redeemed for any one class on shop.mybluprint.com with the exception of classes produced by The Great Courses. Offer cannot be combined with other offers, and is not redeemable for cash. Class coupons are only available for subscribers of a Bluprint paid membership. Current or cancelled Bluprint customers are not eligible for this offer. This offer does not include a free trial. Discount cannot be combined with other offers or promotional codes and is not redeemable for cash. Free shipping is only available for orders shipped within the US. Subject to additional terms. Bluprint may end or alter this offer at their discretion. 

  Ultimate Quilt Package - Free Quilt Kit + 12 FREE Own-Forever Classes With Annual Bluprint Subscription through 3/13/19 at myBluprint.com.Restrictions: One (1) redemption per email address 3/02/2019 12:01AM Mountain Time through 3/13/2018 11:59PM Mountain Time. Instructions for redeeming your kit will be sent via email upon purchase of the Ultimate Quilt Package. Free kit must be redeemed on or before 4/16/2019 at 11:59PM Mountain Time and unredeemed kits cannot be redeemed for any other product or value. While supplies last. Credit/debit card required. Offer cannot be combined with other offers, and is not redeemable for cash. Offer is only available for new annual subscribers of a Bluprint paid membership, which begins immediately upon sign-up. Offer is only available in the U.S. Free shipping is only available in the U.S. No free trial is available with this special offer. You can cancel at any time, but your annual subscription will remain active for the full year and prorated refunds will not be offered. Offer cannot be combined with other offers, and is not redeemable for cash. Current Craftsy Unlimited and current Bluprint customers are not eligible for this offer. Subject to additional terms. Bluprint and Craftsy may end or alter this offer at their discretion.

Thursday, January 17, 2019

ISLAND BATIK AMBASSADOR BLOG HOP


This blog hop's theme is Getaway. Since I don't do appliqué or theme quilts very well I decided to say that making this quilt was a journey for me. The journey involved designing the quilt.

I was given the fabric collection (of course from Island Batiks) called Soul Song. It was in my surprise package that I wasn't able to use until now. The collection was unusual in that it had two completely different looks. Ten of the fabrics were small dots in all different colors and ten were tans and blacks with geometric shapes on them. What do I do with two fabrics that to me didn't go together at all even though they were in the same collection?

Here is a sampling of what the fabrics looked like.


I started like I usually do and open EQ8 and think about doing a log cabin block. Being rushed for time, I decided that I didn't have time to make a lap size quilt of log cabins. So I did something I haven't done before. I made it up as I went a long!

Luck would have it that I received a wonderful package from FedEx labeled Accuquilt that same week. I found out that Accuquilt graciously gave the ambassadors an Accuquilt Go 


with some dies! Perfect timing! In that package was a die for 2-1/2" strips. I also had a die for 1", 1-1/2" and 2" strips so I decided to use my new toy to cut strips. I cut the tan and black strips with the smaller die and the colored strips with the 2-1/2" die.


I then cut them into sections. The fastest way to cut a lot of different strips is to line them up and cut them all at the same size. (I had to use two rulers to get the size I wanted. I don't use my mat to measure.)


I thought maybe a type of Rail Fence quilt would work so I sewed them together alternating the colored fabrics and tan fabrics.


I then laid a few of the blocks out in a Rail Fence design and stood back and looked at it.


Too boring! So I decided to cut them in half diagonally.


Now the tricky part. How do I cut the second piece so that they fit together? It took me a couple tries but finally figured it out. (Luckily I was able to use the ones that I cut wrong since there are only a couple different ways to cut them.)


I put them together. I liked the look but decided that I didn't want to take the time to match all of those seams!


So I cut a thin strip of one of the fabrics in the collection that I hadn't used yet to put in the middle of the block. Now I was happy with the block! 


So I continued with all of the strips and laid it out on my design wall.


I decided that a border was not necessary so I pieced the backing with my leftover fabrics, 


used some wonderful Hobbs Tuscany Cotton/Wool batting, 


that was given to me in my Island Batik box, and put it on my quilting machine. That is where I am right now since I had to get this blog out! Have to figure out how to quilt it now (the hardest part for me). Any suggestions? I always start by quilting in the ditch (with the Aurifil Monofilament thread that I was also given) on each side of the diagonal strips. I'm thinking some type of curves since the quilt lines are all straight.


I was pretty pleased with myself! Not only did I design something that I had no idea what it would look like when I finished but also that I made a scrappy quilt (which is hard for me since I am so predictable and uptight about knowing what my finished project should look like). 

Well as usual I am late getting this out, which has been a pattern for me lately.

I will be having a give away of five fat eighths of some Island Batik fabrics (not from this collection since I used most of it). If you want to be in the drawing be sure to leave a comment and your email address so I can contact you if you win. Also if you have any suggestions for quilting this let me know and if you are interested in a pattern on how to make this quilt with the measurements I would like to know that too. I will be choosing a winner when the blog concludes in the first week in February.


Be sure to follow all of the other Ambassadors blogs on the collections that they received and enter the drawing from Island Batik's blog for 20 FAT QUARTERS!

ISLAND BATIK GIVEAWAY

As always: Do what you love and love what you do. Thanks for reading and please share with your quilting friends.

WEEK 1
Monday, January 7 - Crystal Ball


Tuesday, January 8  - Ditty


Wednesday, January 9 - Elk Lodge


Thursday, January 10 - Feline Fine


Friday, January 11 - Flea Market


WEEK 2
Monday, January 14 - Fortune Teller
Jennifer Fulton- The Inquiring Quilter


Tuesday, January 15  - Gypsy Rose


Wednesday, January 16 - Paisley Park


Thursday, January 17 - Soul Song


Friday, January 18 - Twilight Chic


WEEK 3
Monday, January 21 - Winter Park


Tuesday, January 22  - Bazaar


Wednesday, January 23 - Blossom


Thursday, January 24 - Boho


Friday, January 25 - Brookview


WEEK 4
Monday, January 28 - French Blue


Tuesday, January 29  - Midsummer Night


Wednesday, January 30 - Oh Deer


Thursday, January 31 - Snow Berry  


Friday, February 1-  Candy Cane Lane and Icicle
Anne Wiens- Icicle - Sweetgrass Creative Designs


Barbara Gaddy - Candy Cane Lane  -Bejeweled Quilts by Barb