Search This Blog

Monday, January 8, 2018

EVOLUTION OF A QUILT

I don't make yearly resolutions because I always know that I keep them for about a month (if I am lucky) and then they just fall by the way. I did tell myself that I really wanted to start up my state block challenge again. I stopped at Florida. I had a few following me and thought maybe with my larger Instagram following more would join me. I sure hope so.

I looked over the blocks that I had finished and thought that I would start with a whole new set of fabrics to make it more interesting for me (and you). So I laid out the blocks (I chose 16 of the ones I did) and decided to sew them together to make a wall or small lap quilt. I hope those of you who did join me in this challenge would also put those blocks in a quilt and share them with me. I'll be posting the finished quilt in future blogs.


What my post is about today is to show you how I go about making a quilt with my Kaleidstars block. I first choose which symmetrical fabric(s) I want to work with. I had just gotten in two new Jane Sassaman fabrics in my shop and, of course, had to start to play! You can get the fabrics here:
Queen of the May and Scandia.


So I get out my Marti Michell Magic Mirrors (available on my website) and start playing with both fabrics.


After looking at all of the design possibilities, I cut out all of the diamonds. I used both fabrics so I had to cut four repeats of each fabric for each block. In my book and iQuilt class I show you how to get perfect repeats every time. Then I played with the combinations. You can get my iQuilt DVD here: iQuilt Kaleidostars.

 Next I had to audition different color backgrounds.

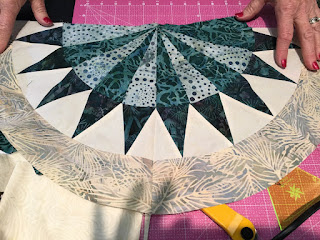
I decided that I liked all of the colors so I chose to make my Parfait pattern from my book Kaleidostars.  This block uses the 17" Kaleidostars templates.

Next I pieced the blocks. I love how easy the blocks are to put together. I realized that the corners of the blocks should be dark so I picked out a wonderful black dot fabric (available on my website) that has every color dot in it that coordinates with the fabrics.  

 Here is how the blocks came out.


See how easy it is to put together. No "y" seams! 

Now to sew the blocks together! Each block is framed with its color, then framed in black. A border of each of the colors to match the blocks is then added, and last, one more black border.


I hope this gives you a glimpse of how I design my quilts. I am selling kits for this quilt on my website: Jane Sassaman Parfait quilt kit. To sweeten the pot, I have added my 17" Kaleidostars templates, my Kaleidostars book, and my 1/4" seam guide at NO EXTRA CHARGE! The whole kit would retail for $134.50 and is only $80! There will be a limited number of kits available, so be sure to get yours early.

*********To make this more interesting, please leave a comment at the end of this blog and tell me what  SYMMETRICAL FABRIC on my website you like the best and a winner will be drawn to get a fat quarter of that fabric along with my 1/4" seam guide.

On my next post I hope to have the first State Block challenge blocks up.

As always: Do what you love and love what you do. Thanks for reading. Please share this blog with all of your quilting friends.


Monday, January 1, 2018

2017 in a Nutshell!

HAPPY NEW YEAR!

Hi all. I know I have been very negligent about writing my blog. It would be much easier if I wrote it as things happened instead of writing most of it all at one time, but here I am doing just that!

My last post was in August when my Craftsy class Clever Curves went live. Would you believe I have almost 2000 quilters signed up for that class? I can't! I have had such wonderful comments about that class, it makes me very happy to see so many quilters learning a new technique that they didn't think they could do. Some of them have shared their photos with me and you can read some of the comments on my new Testimonials page on my website.  I hope you can help me get to 2000. 

Craftsy has a new subscription policy where you can get unlimited access for a small monthly fee. CRAFTSY UNLIMITED. This way you can preview any class and if you like one and want it in your permanent files you can still purchase it. They have been running 14 day free trials so check to see if that is still going on. If you decide to check out my class and like it, please use this link for 50% off my class. CLEVER CURVES. (Coupon Details: Get 50% off the full retail price of select Craftsy classes taught by Toby Lischko. Cannot be combined with any other coupons. Expires April 1, 2018.)

This year has been quite a year for me. I had some wonderful trips in the first half of the year, which I discussed in earlier blog posts. The second half of the year was even better. I got to visit my son Nick in Austin, Texas while teaching at a quilt guild in Garland, Texas which is near Dallas. They were so nice. Since I lectured on a Tuesday and wasn't going to teach class until Saturday, they paid for my trip to visit my son!


I taught a great class on my Hourglass quilt and there were some wonderful blocks. I stayed with a fantastic quilter who made me feel right at home.


I taught at the AQS show in Grand Rapids, Michigan. I got to judge the quilts for the first time. It was quite an experience. I taught 5 classes and gave a lecture. The classes were a huge success and there were a lot of happy quilters with new projects to show off to their hometown guilds and quilting friends. Here are some happy quilters!

Eden class
Eden Class
Eden Class

Eclipse class

Eclipse class
Yin and Yang class
I also got to meet Paula Nadelstern for dinner which was quite a thrill for me. We have been corresponding for years because she always asks me to design something with her new fabric collections but we have never had a chance to meet face to face until now. I found out that we have a lot more things in common other than quilting.


I went to Durham, North Carolina to teach and lecture to a wonderful quilt guild there. While there I got to see an old friend I hadn't seen in over 30 years. I lived in Hillsboro, NC when my kids were young and made friends with a great group of ladies with kids the same age as mine, while running my own preschool. I found out that she was a quilter and she ended up taking my class even though she wasn't a member of the guild. We got to catch up on a lot of things in between teaching the lessons.


I taught my Millefiori class which is the New York Beauty block with a background fussy-cut with a stripe and the center of the block fussy cut. The class has a new name which I now call "Framed".


Along with my Craftsy class, Craftsy also asked me to be an exclusive designer for them. It didn't mean that I couldn't design for anyone else. It just meant that the quilts I designed for them were exclusive to them for a year. I worked with a beautiful fabric collection called High Society. I made two quilts with the collection. One for beginners and one a little more difficult. They posted the quilt kits in November and by Cyber Monday all of the kits had been sold!

Lords and Ladies

Creme' de la Creme'


Right now they aren't selling just the pattern alone but I am taking a list of people interested and as soon as my year contract is up with this pattern, I will be selling it on my website. I do now sell templates to go with the Creme' de la Creme' and Eden quilt, which are used for the star block.
You can see them here:  Eden Star templates.

So what is in store for 2018? I hope to start up my state block challenge again. I feel bad that I just dropped it because of all of the other things I was busy with. I purchased a lot of new Symmetrical fabrics that will be great for that project.

Here are a couple Jane Sassamann fabrics that would be great for this challenge if you don't have anything to use. You can find them here on my website:

Scandia Vineyard Blue 
                                                                                                                      Queen of the May


I will be working on the next blocks (Georgia) in a week or so with a new fabric collection. I also will sew the previous blocks together that I made last year so that you can see you don't have to do all of the blocks to make a quilt.

Well I should get this to you before the new year isn't new anymore!!! I hope this proves to be a productive and happy new year for all of my friends. As always; Do what you love and love what you do. Thank you for reading and feel free to pass on my blog to your friends. Toby Lischko.

Thursday, August 3, 2017

CRAFTSY CLASS LIVE

Just a quick note. My Craftsy class is live! For a limited time (until Friday August 4) you can get 50% off the original price of $39.99. 
(50% off the full retail price of select Craftsy classes taught by Toby Lischko. Cannot be combined with any other coupons.) Use this link to sign up. Clever Curves: Piecing Techniques.


You get these 3 patterns and lots of wonderful tips!

I received this testimonial from a student after signing up for the class.   

"I've paper pieced for many years. I have tried this technique before but the teacher made it seem so complicated that I went back to regular paper piecing ...with that said, you are making it so easy to understand with your demo that yes I will try it again and think I already have this template set!! Also your camera man is getting great shots showing what you are doing!!" 

I hope you consider taking my class. I promise that after taking it you will never be afraid to do curves again!

As always: Do what you love and love what you do. Thanks for reading. Toby

Sunday, July 30, 2017

NEW WEBSITE AND WONDERFUL NEWS

Sometimes life just takes a leap! This year I started that state block challenge hoping to keep up with the weekly blocks. I am so sorry for those who were following it that I have dropped the ball. I do plan to start that up again after the first of the new year. 

Now you are probably asking why am I waiting that long to start it up again. Well, a lot has happened in the last 3 months! In March I found out that Craftsy had accepted my proposal for an online class so the next 3 months were consumed with phone conferences, writing patterns, making samples (sometimes two of the same quilt), writing script, and rehearsals! I filmed the class in June.


The class is called "Clever Curves: Piecing Techniques". It goes on line tomorrow! It features 3 very different quilt designs starting with a very simple hourglass block that I designed. I demonstrate how to get that perfect 1/4" seam allowance, a no nonsense way to make your own templates, how to use those templates, and my special pinning method for no pleat curves.


The second quilt, my pattern Glorified Nine-patch with a Twist, continues with the theme of using templates and sewing curves. I demonstrate how to make a fast nine patch with seams guaranteed to match, more curve piecing and how to make setting blocks and corner blocks to turn the quilt into an on-point setting. Along with that I show you my special binding technique where the binding matches the outside blocks. This technique won me a first place ribbon in a local quilt show.


The third and final quilt is the one that I made for my "Unfoundation 101" piecing class. I called the pattern Crowned Jewel. The fabrics in this block are to die for! In this class I show my no tearing (taking paper off, but it is a method you won't cry about either) paper method using freezer paper, how to sew tighter curves and how to fussy-cut the center to really make the block pop!


I promise you after taking this class you will never be afraid of curves anymore.
This class goes on line tomorrow. I am very excited about it! I will be sending out a code for a special discount and talking about some give-a-ways tomorrow after it is "live". All of the fabrics in these quilts are available on Craftsy's website.

But that is not all I have been doing. I was also asked by Craftsy to design some exclusive designs that they will kit. I have to make 2 large quilts in 6 weeks! I can't reveal those yet, but they will be on their website in November. The fabrics are very home deco.

While this is all going on I have also been traveling and teaching. In May, I lectured and taught at a quilt guild in Marshall, MO. What a wonderful group of quilters! Then I went to Columbia, MO and lectured in June. At the end of June I flew to Denver and filmed the Craftsy class. In July I traveled to Kansas City, MO and lectured. 

Also in June I decided to update my website so I have a new and shiny website (still the same url) Gateway Quilts & Stuff. For my new website I am having a special launch starting today. All purchases will receive a 10% off  and that includes my already reduced prices on my fabrics. I just got two wonderful fabrics from Quilting Treasures called Imperial Paisley. It is a symmetrical print perfect for my fussy-cutting classes! You can find them here: Navy version and white version. I can't wait to start playing with them!


The first 10 orders over $25 will receive my special seam guide free and all orders over $100 will get free shipping.

One new wonderful thing about my new website is that I now offer PDF downloadable patterns. I no longer have to take orders, email the patterns and refund the shipping. Whoopee!!!! This is my newest pattern; Moon Over New York. I also have lots of free web patterns that I have been designing over the last 15 or so years that are no longer on the fabric company's websites. I hope you get a chance to look at my new site and please feel free to send comments on what you think about it. I have a new feature that you can search for anything on it by using color, manufacture, design, theme, etc.

Well, I have to finish packing for a guild lecture and workshop in Fort Wayne, IN tomorrow so I'd better close this out. I think I've packed today's blog with lots of new and fun information. Stay tuned for more information on how to sign up for my Craftsy class.

As always: Do what you love and love what you do. Thanks for reading and feel free to share with all your quilting friends. Toby Lischko.


Friday, May 5, 2017

RJR What Shade am I


-->
I have been designing quilts for RJR for a long time using their current fabric collections. I enjoy taking a traditional type fabrics and creating a quilt design that really shows off many of the different types of prints within the collection. I found it easy to choose blocks to compliment the various types of fabric themes.


When they asked me to design a quilt with their solids collection, I thought, this shouldn't be too hard. How wrong was I! I knew I wanted to use a traditional block just because I am a traditional quilter and I always refer back to those types of blocks, but I needed to change it to make it more "modern". The hardest part was picking the fabrics!


I really like playing with log cabin blocks. I have made quite a few log cabin quilts over the years, mostly scrappy with traditional fabrics.


With this log cabin block I wanted to do gradations of two colors. The difficult part was finding the exact gradation that I liked the look of. I could find 4 tones but then the 5th one didn't look right. Or I could find 5 tones and the 6th didn't look right. I'm just way too picky when it comes to putting colors together. If I have a large or main print in a fabric collection, it is easy to see what fabrics would go well with it. When I have solid colors, the challenge was, how do I choose which colors I like best together. I finally ended up with peach and aqua.


These are the colors I picked:

235 Paris, 278 Just Peachy, 338 Flamingo, 277 Elephantastic Pink, 339 Tropicana, 257 Amaryllis, 294 Cove, 274 Riviera, 292 Turks & Caicos, 354 Horizon, and 289 Proud as a Peacock. 


I work up all of my quilts on Electric Quilt 7. I can play with all types of shapes, layouts, and colors. This is the block I started with. It has one side of the logs larger than the other side which creates a curved effect.


Instead of having it as a square block, I decided it should be a rectangle. So it became this.

One of the challenges in making it a rectangle was if the small logs were consistently the same size, I couldn't make them fit together as they do in the square block so I had to put two logs that end at the same place towards the outer edge. (It's a math thing!)


I still wasn't quite done. So in the center to help make the transition from one side to the other I added a triangle.


Now I was ready to design the quilt. I could have just gone with a traditional setting so on my Electric Quilt 7 I started playing with different layouts. Some traditional....


And one sort of traditional but not completely balanced. This is the one I finally ended up with. I did discover something I didn't know about rectangular blocks like this. The block can't just simply be turned to create the layout. I had to make a left and right version of the block.


Now for the hard part, the quilting. I always stress about the quilting. I work so hard at getting all of the pieces just right, I think I am going to ruin it with the quilting! I was able to work with some motifs in EQ so I played with 3 different designs.


To make things easier on myself, I chose the last option. I'm not very good at grids, but even if they weren't perfect, it wouldn't be that noticeable. You know that sign that says "Plan ahead" and someone paints themselves into a corner? I did not use any tools other than a ruler to make the lines, all of which are not perfectly even. Well, I'm quilting along and realize that the lines have to match up in the center of the design. What if I didn't have the same number of lines on the left side of the quilt as the right side. I breathed a sigh of relief when it worked out okay, but realized that there was another area where they come together. Guess what? I had seven lines on the right side and eight lines on the left side. What to do? Take out a whole line (or lines) of quilting? Luckily one side I only had some short stitching lines that I could take out and divide the space into 3 instead of 2 lines. I used Wonderfil’s Invisafil thread so that the quilting was just an accent and not the focus of the quilt.
-->
As an afterthought, whenever I make log cabin blocks, I like to double (or triple) the size of the front blocks to make the backing. For this one I made the original front block 10" x 12" so the back blocks are 20" x 24" which made 4 fit perfectly with some off center borders.

The last think I thought about was whether to put a border or binding on it. I decided with neither and made a faced binding (folded to the back) for the first time ever. 

I call the quilt Sorbet. It just makes me think of cool iced deserts. I didn't have any fancy places to take photos like I have seen in previous blogs (like the beach) but I did have a nice sunny day to take these photos.


Thank you RJR for giving me this challenge. I loved working with the fabrics. They have a wonderful body and sew up so nice. 
 
-->
If you haven’t seen all the stunning projects that have been featured in the #whatshadeareyou series, hop on over to Instagram to check out the hashtag. While you’re there, visit and follow me (@tlischko) and follow RJR (@rjrfabrics) for two chances to win a FQ bundle of the solids I chose for my quilt!

As always: Do what you love and love what you do. Thanks for reading, Toby Lischko.