Search This Blog

Sunday, February 11, 2018

ISLAND BATIKS AMBASSADOR PROGRAM/GALENTINE'S PROJECT

Last year at the end of the year, I was told by a quilting friend of mine about a special program that Island Batiks has to help promote not only their fabrics but also many quilt designers. It is called the Island Batiks Ambassador program. I filled out their application, sent in one of my pieced blocks and waited for the response.

In January I got the email, "You have been chosen to participate in the Island Batiks Ambassador program!" Wow, I was thrilled! I was honored to be chosen as one of 43 other ambassadors, many well known and talented quilters!  Now I waited for more information as to what my responsibilities would be. I received a follow-up email sending me lots of letters, charts, and schedules as to what I was to do with this new responsibility.

In that information was a monthly schedule on what projects I was suppose to make. They all had special themes. I was also told how to promote my projects (and their fabrics and affiliate sponsors, Aurifil Threads and Hobbs Batting). They encouraged us (all the ambassadors) to post blogs related to our projects, share them on Facebook, Instagram, Twitter, Pinterest, and any other means to get the news out. A couple days ago I received a box of the most beautiful fabrics and also Hobbs batting and Aurifil threads to use for all of my projects.


So here is my first post and my first Island Batik project. This month's theme of course is Valentine's Day. The project is called Happy Galentine's day. It is a holiday created by the fictional character Leslie Knope from the TV show, "Parks and Recreation". The only requirement for the project was that it had to be 12" x 12" or smaller and be a postcard or mug rug. It didn't have to be a Valentine's theme but I thought since the fabrics they included were red, pink and white I would stick with that.


In corresponding with some of the other Ambassadors, Kate Colleran of Seams Like a Dream Quilt Designs asked if anyone would like to use her Braid template for any of the projects. She was retiring as an Ambassador but would continue to follow what everyone was doing. Since you all know that I love working with templates, I asked her if I could have the mini one to try and she sent it to me. You can find it here: Mini Braid Template.  She also has a larger template: Braid template. When I received it I had to play with some scrap fabrics to see how it worked. I found it very easy to use and thought it would be perfect for making a heart in my project even though that is not what it was intended for.


So.... here are the steps for making your own Galentine's mug rug. Be sure to read all the way to the end of the blog so you can find out how you can win your own mug rug kit including the Mini Braid template! I'm calling mine "Braided mug rug".

The mug rug finishes at approximately 5" x 7" and here is what the finished project looks like. The heart is a little wonky but I think that is what adds to the charm of the project! I did choose to use the backing to create the binding instead of cutting and sewing a separate binding so that it would be finished quicker!


Here is what you need and what to cut: (You can use scraps that are at least 1" wide.)
If using the template cut:
Light fabric: Cut three (3) 1" x 16" strips and four (4) 1-1/2" x 6-1/2" rectangles.
Four different color prints: From each cut two (2) 1" x 5" strips.
From one of the color prints: Cut a 8" x 10" rectangle for the backing.
Batting (I used the Theramore batting): Cut an 8" x 10" rectangle. 

***If you do not have the Braid template, cut your pieces as follows just for the braid:
White: Twelve (12) 1" x 3-1/2" rectangles.
Four different Prints: Two (2) each 1" x 3-1/2" rectangles.
Place two of the same 1" x 3-1/2" fabric strips wrong sides together, line up the 45 degree line on the bottom of the strips and trim off the corner from one end. You will get a left and right cut from each.


The directions on how to use the Braid template are included with the template, but here are the steps to get the heart using it. If you cut the sections with your ruler, skip steps 1 and 2 and start with step 3.

Step 1. With the two 1" x 5" fabric strips placed wrong sides together, cut out one left and one right patch with the template as illustrated. Be sure to straighten out one of the edges before cutting. Use the 3-1/2" line on the cut edge. The left and right patches will be cut at the same time. Repeat with all four different fabric prints.


Step 2. Repeat step one with the white 1" x 16" strip, (fold the strip in half, wrong sides together) rotating the template every other cut so that the diagonal cut edge is even with the diagonal edge of the template at the 3-1/2" mark. Cut six left and six right patches. (You will get 2 left and 2 right from each strip.)


You will have the following sets.


Step 3.  Take a left and right white patch and sew together as shown.


Press to left strip.


Step 4. Sew a left patch as shown. Press to left patch.


Step 5. Sew a right patch as shown. Press to right patch.


Step 6. Continue sewing a left and right patch for 3 left and 3 right white patches.


Step 7. Continue sewing a left and right patch with the four different prints as shown.


Step 8. Finish by sewing the remaining 3 left and 3 right white patches for a finished section as shown.


Step 9. Using a ruler, line up the 1-7/8" line along the center points at the top and bottom as best as you can. Trim the right side.


Step 10. Line up the 3-1/2" mark on the cut side and trim off the other side.


Step 11. Trim off the top and bottom lining up your ruler along the dip at the top and the shortest edge at the bottom as shown. Be sure to use one of the lines on the ruler to keep it squared.


Here is what your finished trimmed section looks like. It should measure approximately 3-1/2" x 5-1/2". (The 5-1/2" size might be a little smaller or larger depending on your seams.)


Step 12. Trim two of the 1-1/2" x 6-1/2" white strip into two 5-1/2" lengths (or your own personal measurement). Sew to sides. Press to white strip.


Step 13. Cut the remaining two 1-1/2" x 6-1/2" white strips to two 5-1/2" lengths. Sew to top and bottom.


Step 14. Layer your pieced top, batting and backing piece, centering the top so that there is an equal amount of fabric extending around all the edges. Quilt as desired. I just did some straight line stitching in the borders and some stitch-in-the-ditch around the center of the block and the heart.


Step 15. Fold the backing to the back and trim off the excess batting one side at a time to be even with the top. Trim the backing to 1" around the top.


Step 16. Press the backing edges to be even with the top on all four sides.


Step 17. Cut a small square off each corner (don't cut all the way to the corner) to eliminate some bulk in the corners. If you don't want to miter the corners leave out this step.

Step 18. Fold in each corner, fold and press the edges to cover the top. I used Elmer's School glue to to hold the binding down (just a few drops of glue and press it with a hot iron). If you don't want to miter the corners just fold in opposite edges and press then fold in the top and bottom and press.


Step 19. Using some type of decorative stitch, secure the binding to the top. If you want, you can sew the miters closed with a few hand stitches and matching threads. Isn't this cute!
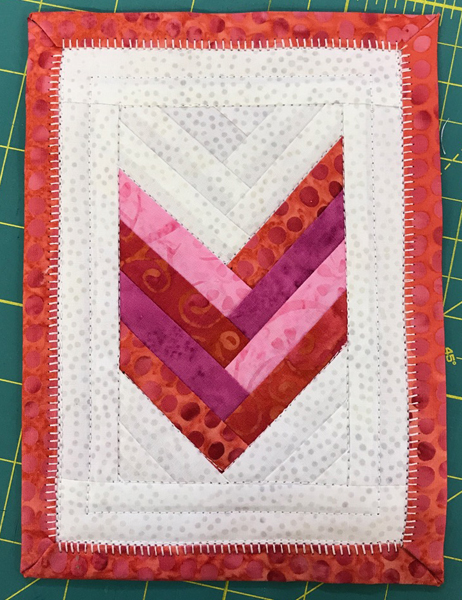


So, how can you win a kit to make this easy mug rug? Simply leave a comment at the end and tell me who you will make it for. (It's okay if you want to make it for yourself!) The kit will include the Island Batik fabrics (pre-cut strips) needed to make this exact project including the batting and backing, the Mini Braid template that Kate has so generously donated, and my 1/4" seam guide. Be sure that I have your email so if you win I can contact you and get your address. I'm sorry but due to the high cost of postage this is just for USA participants. Everyone is free to print out the directions of this post for the pattern instructions. If you share it please include my name as the maker of the project. A winner will be drawn on February 15. No purchase required to enter this drawing.

As always: Do what you love and love what you do. Feel free to forward this blog to all of your quilting friends! Thank you for reading.


Wednesday, February 7, 2018

STATE BLOCK CHALLENGE HAWAII BLOCK 2

 7 day FREE trial on Craftsy Unlimited

Today's block isn't necessarily more challenging than block 1, but it does have more places to fussy cut (and less pieces). There were two blocks that I could have used for this one. I posted both of them on my Instagram page and asked which one they would prefer to do. The first one got a few more votes than the second one so that is the one I chose to do. I like the second one better as a challenge for myself, but I didn't want to make it too hard for you. I may still make that second one if I find the time!


Here are the fabrics I picked for that block. I thought that using both of my symmetrical prints it would look a lot more interesting. Remember, you can use as many or few fabrics as you want. These are just suggestions.


Here are the templates cut out. Be sure to draw a center line in those that you want to fussy cut.

 
Here are the patches cut out.


Cutting instructions:

Fabric 1 Symmetrical fabric 1 Dark
* Cut four (4) Template A.
* Cut four (4) Template G. 
Fabric 2 Symmetrical fabric 2 Light
* Cut four (4) Template F.
Fabric 3 Light
* Cut four (4) Template E.
* Cut four (4) Template C.
Fabric 4 Yellow
* Cut eight (8) C.
Fabric 5 Dark purple
* Place fabric wrong sides together and cut out four (4) B and (4) D. They are a right and left piece and will be cut out at the same time.

Piecing instructions:

Step 1. Sew a Fabric 4 C to each side of a Fabric 1 A. Press to Fabric 4. Make four.


Step 2. Sew a Fabric 5 B and 5 D on each side of a Fabric 3 C. Press to Fabric 5. Make four.


Step 3. Sew the unit from step 1 to the unit from step 2. To keep the points together use two pins on each side of the point. Press seam open. Make four. 

 
Step 4. Sew a Fabric 2 F to a Fabric 3 E. Press to Fabric 3. Make four.


Step 5. Sew a Fabric 1 A to the top of the unit from step 4. Press to Fabric 1. Make four.

 
Step 6. Sew the unit from step 3 to the unit from step 5. Match seams. Press seam open. Make four. Make sure you keep the same unit on the right side.

 Step 7. Sew two quarters together. Press seam open.

Step 8. Sew the halves together. Match centers and use two pins on each side of the center seam. Press seam open.


VOILA! Finished Hawaii Block 2!

Here is the link for the templates (sorry I forgot to include it)!
Hawaii Block 2 templates.

This was a fun block! I can't wait to see what you come up with. Next state is Idaho. I will show off some more of the participants blocks. Be sure to send me the image of your block so I can post it.

As always: Do what you love and love what you do. Feel free to share this with your friends and leave a comment to let me know how I am doing. Thanks for reading. Toby

Clever Curves: Piecing Techniques with Toby Lischko
Make something that means something at Craftsy.com


Saturday, February 3, 2018

STATE BLOCK CHALLENGE HAWAII BLOCK 1

Well the groundhog did not see his shadow on Friday so that tells us there will be six more weeks of winter. Just gives me more excuses to stay inside and quilt! 

The first two blocks from Georgia were send to me by Jeannie S. Way to go Jeannie!

  
After making Georgia blocks 1 and 2 and writing the directions, I decided to devote each blog to writing the directions for one at a time. It makes for not so long of a blog and you can concentrate on making the blocks one at a time. If you want to make only one but aren't sure which one you want to make, then you can wait to see the next one which I will post in a couple days.

Both Hawaii blocks have quite a few pieces in them. It is difficult to say which one was harder. Block two has more odd shapes, but sewing either of them together is not difficult. Today's block has 65 pieces! With all of those pieces I can't stress how important that accurate 1/4" seam is. If you struggle with that consistent seam and you don't have my "Perfect 1/4" Seam Guide" then you might want to think about purchasing it. I have a Youtube video on how to use it. If you haven't seen it yet you can view it here:


Also since all of these blocks are 12" finished blocks, you can use Marti Michell's Template sets A and B for some of the shapes. I also carry those on my website. Set A / Set B. If I use them with any of the blocks I will tell you which ones work with the block.

Hawaii block 1 looks like this without fussy cutting the pieces.


Here are the fabrics I picked for the block.


Here are the templates I made (or used Marti Michell's). Remember to draw a center line on the ones that you want to use for fussy cutting. If you don't want to make templates for the triangles or squares, you can use the patch size cutting instructions.


Here are all the patches cut out!


BLOCK CUTTING INSTRUCTIONS. (QST=quarter-square triangles, HST=half-square triangles) Marti Michell templates = MM. When cutting the HST or QST be sure to follow the straight-of-grain line on the templates.

Fabric 1 Main Print
* Fussy cut four (4) Template G (MM A3)
* Fussy cut one (1) Template H (MM B10)
Fabric 2 Light
* Cut eight (8) Template C or cut two (2) 4-1/4" squares and sub-cut twice diagonally into eight (8) QST.
* Cut eight (8) Template B (MM D29) or cut four (4) 1-7/8" squares and sub-cut once diagonally into eight (8) HST.
Fabric 3 Light blue
* Cut eight (8) Template C or cut two (2) 4-1/4" squares and sub-cut twice diagonally into eight (8) QST.
* Cut eight (8) Template A (MM B12) or cut eight (8) 2-1/2" squares.
* Cut four (4) Template F (MM B14) or cut one (1) 3-1/4" square and sub-cut twice diagonally into four (4) QST.
Fabric 4 Dark purple
* Cut eight (8) Template C or cut two (2) 4-1/4" squares and sub-cut twice diagonally into eight (8) QST.
* Cut eight (8) Template F or cut two (2) 3-1/4" square and sub-cut twice diagonally into eight (8) QST.
Fabric 5 Red
* With fabric folded wrong sides together cut four (4) Template D. You will get a right and left section at the same time.
* With fabric folded wrong sides together cut four (4) Template E. You will get a right and left section at the same time.

PIECING INSTRUCTIONS

Corner units
Step 1. Sew a Fabric 2 Template B HST to each diagonal corner of both Template D and Template E patches. Press to red. You should have 4 right and 4 left of Template D and Template E sections.


Step 2. Sew the pieced Template E patches to the sides of the Fabric 3 Template A squares as illustrated. Press to squares.
 

Step 3. Sew the pieced Template D patches to the other side of the squares as illustrated. Press to Template D. They should equal 3-1/2" square.


Edge units
Step 4. Sew a Fabric 3 Template C QST and Fabric 4 Template C QST together. Press to Fabric 4. Make 4. 


Step 5. Sew a Fabric 2 Template C QST and Fabric 3 Template C QST to each side of a Fabric 1 Template G. Make sure to make the fussy cut piece facing in the correct direction. Press to Fabric 1. Make 4.


Step 6. Sew Sew a Fabric 1 Template C QST and Fabric 4 Template C QST together. Press to Fabric 4. Make 4. 


Step 7. Sew the units together, matching seams. Make 4. The unit should equal 3-1/2" x 6-1/2".


Center unit
Step 8. Sew a Fabric 4 Template F QST to each side of a Fabric 3 Template A square. Press to Fabric 4. Make 4.


Step 9. Sew a Fabric 3 Template F QST to each side of the pieced unit from step 8. Press to Fabric 3. Make 2.


Step 10. Sew the units from step 8 to each side of the Fabric 1 Template H square. Press to fabric 1.


Step 11. Sew the units from step 9 to each side. Press to corner units.The center unit should equal 6-1/2" square.


Putting sections together
Step 12. Layout the 4 Corner units, 4 Edge units and Center unit together as shown. Sew across each row. Press rows 1 and 3 to corners and row 2 to center. Sew rows together. Press seams out.


Here is the link to the templates. Hawaii block 1.

As always: Do what you love and love what you do. Feel free to share this blog with your friends and please leave a comment if you like it. If you have any questions about the directions or if I made a mistake, use my contact form to let me know. Thanks for reading. Toby