Search This Blog

Tuesday, August 11, 2015

Summer Waters Blog Hop Winner

This will be a short post.

Thanks to all who participated in the Summer Waters blog hop! I'm glad you were all excited about getting my pattern. I know that those of you that received it will have a great time making it. Please send me your finished quilts when you make them (I didn't say IF) and I will share them on my blog or Pinterest page.

Now to the winners. The winner of the 8 fat quarters is Denise Smith. She told me that this was her first blog hop so I guess it was beginner's luck! I will email her to let her know (unless you are reading this blog). I will need her address.


The winner of my Cutting Corners template set is Allison Church Bird. She is one of my Facebook fans. I'm sure Allison will find lots of ways to use this template set.


Congratulations to both of them. I hope the rest of you that participated will continue to follow my blog or my Facebook page.

I will have more giveaways in the next few weeks. I still have quite a few fat quarter bundles from P&B that I haven't given away yet.

As always: Remember to always do what you love and love what you do. Toby

Saturday, August 8, 2015

Quiltwoman.com Summer Waters blog hop


                                             Quiltwoman.com's Summer Waters Blog Hop

 If you have been following the Summer Waters bloggers so far, you know that there is much more in store on Quiltwoman.com 's Summer Waters Blog Hop. I am fourth in the hop and I have a summer treat for you. Not only will you be in the drawing for a fat quarter bundle, but also someone will win my Cutting Corners template set AND ANYONE that emails me at info@gatewayquiltsnstuff.com after reading this blog will receive a free pattern download. If you click on any of the links (blue words) it will take you to Quiltwoman's website or mine, Gateway Quilts & Stuff. Quiltwoman carries many of my patterns.

Summer is more than half over but I'm still thinking of cooling waters and when I think of waters I think of fish! My project for today is my Swimming Downstream quilt pattern. Doesn't it look like fish swimming down stream? This pattern is so easy (made with rectangles and squares) you will want to make one after you see how easy it is to sew!


My quilt has ten fabrics, but if you wanted to, you could just use one dark and one light or make it scrappy. The fabrics used in my quilt are from a P&B collection called Mykonos. These fabrics are available for sale on my website or you can purchase the fabric kit to make the quilt.


Here are the simple steps for making the block. 

1. Start with thin and wide rectangles and squares to match the width of the rectangles.


2. You can take the time to draw a diagonal line down the backs of the squares or you can use my Cutting Corners template set to trim the corners off both the small rectangles and large rectangles. Line up the square on the right end of the rectangles and trim using the template lined up along the left edge and top edge of the square.


On the connecting strips place the squares on the left side of the rectangles and cut off the corners.


3. Sew the triangles using a 1/4" seam allowance (or sew on the drawn line). Press the triangle seams in opposite directions. Then sew the narrow rectangles together, the wide rectangles together, and then sew the two strips together. Press to the larger triangles.


4. Then sew the two sets together and the result is a fast easy block! I made this sample in a half an hour.


The quilt is constructed with the blocks offset by half a block in every other row so that the fish aren't all in the same row across.

Now, anyone who leaves a comment either on my Facebook page or at the end of this blog will be in the drawing for a fat quarter bundle of the Mykonos fabrics.


Or a Cutting Corners template set. Names will be drawn randomly and there is no purchase necessary in order to win. The first name drawn will win the fat quarter bundle.


I hope, if you do visit my Gateway Quilts Facebook page please "like" it. I would love to reach 2,000. I'm soooo close. There is also a link to my newsletter if you would like to sign up to receive it.
 
If you prefer to send a private email to info@gatewayquiltsnstuff.com that is fine too. That way I will have your email address so I can contact you if you win and I will also be able to send you the Swimming Downstream pattern. If you leave a comment at the bottom of this blog, be sure to include your email address. I have had a lot of winners who were unable to get their prize because I had no way of contacting them. Don't be that person! Good luck!

If you haven't visited the previous bloggers, please take the time to do that. They all have special tutorials and drawings also.

Remember: Always do what you love and love what you do. Thank you for reading. Toby

8/5/2015
Carol Steely
8/6/2015
Heidi Pridemore
8/7/2015
Kathie Donahue
8/8/2015
Toby Lischko
8/9/2015
Jessica J.E. Smith
8/10/2015
Diane McGregor
8/5/2015 Carol Steely funthreads.blogspot.com
8/6/2015 Heidi Pridemore www.TheWhimsicalWorkshop.com
8/7/2015 Kathie Donahue http://www.prairiecottagecorner.blogspot.com
8/8/2015 Toby Lischko gatewayquiltsnstuff.blogspot.com
8/9/2015 Jessica J.E. Smith www.quiltHacks.com
8/10/2015 Diane McGregor http://www.castillejacotton.net/blog

- See more at: http://www.tamarinis.typepad.com/#sthash.2hue65e3.dpuf
QuiltWoman.com is featuring her first ever blog hop, showcasing seven different designers.  So pour a fresh cuppa, curl up in front of the computer (under the fan - whew, it's been hot out there!), and dive into seven different projects celebrating one of the best things about summer: water fun! - See more at: http://www.tamarinis.typepad.com/#sthash.2hue65e3.dpuf

Saturday, May 9, 2015

100 Blocks Winner and Curves tutorial

I received such wonderful comments about my block. I even got suggestions on what other changes I can make.

One person suggested I rotate the triangle so that you get a diamond in the middle.


When you put it in the quilt you get this.


Another person suggested I put a small snowball block in the corner with the curve.


So when you put it in the quilt you get this.


Both are wonderful ideas! What fun. That just makes me want to play with the block some more.

Now to the winners. The two people who won a copy of the magazine are Kathy Harris and Lori (did not leave a last name). Congrats ladies!

The winner of the fat quarter bundle is Lisa Marie. I will be sending emails to each of the winners to get their addresses so I (and Quiltmaker) can mail the magazines and fat quarters to them.

Many of you said you liked the block but were afraid to do curves. So I am repeating one of my earlier posts about sewing curves.

I did this demo with my Glorified Nine Patch template set. This set comes in a 4", 6" and 9" set. They are available on my website Gateway Quilts & Stuff I also have other sets available including, New York Beauty, Chinese New Year, Hour Glass, and Yin and Yang.

Step 1: Crease the center of one edge of the concave (inny curve) piece and the convex (outy curve) edge of the other piece. Tip, crease one with right sides together and the other with the back sides together. The creases will fit inside each other. Place the convex piece on the bottom, curve and right side up. Place them, right sides together, with the concave piece on top. Pin at the center. I know it looks funny and doesn't look like the pieces will sew together. Pull the top ends to meet the bottom ends. All of the trimmed ends on the two pieces fit on top of each other (with my template sets).


Step 2: Pin the front end and the back end. This is very important. Because these are the edges that move while you are piecing, you need to weave the pin like you are sewing. This holds the edges together as you are sewing and won't twist when you begin and when you get to the end. I like to use Patchwork Pins by Clover that are 0.4mm wide (not long) that are available on my website. These are great pins that slide through the fabric like butter, especially batiks. I add one more pin. This one I weave at the back end of the strip along the seam allowance to create a "T" with the other pin. You can see it in this photo. The first pin is woven up through the two pieces (same on the front end) and the other pin is perpendicular to it and parallel to the seam line. You can also see that the ends of the bottom patch and top patch fit together perfectly.


Step 3: Sew a couple stitches, leaving the needle in the fabric, take the pin out and then grab the center of the block where the center pin is. This is another important step. Pull slightly on the center of the block where the pin is with your left hand. As you do this you can manipulate the fabric with your right hand so the bottom edge and top edge of the fabric are even. Sometimes you only have to do a minimal amount of manipulation. The edges will come together as you pull on the two fabrics. It is difficult to see here because of the dark sewing machine, but if you look carefully the edges are even as I tug slightly on the fabric. Do not "stretch" the fabric too much. A slight tug is enough.


Step 4: As you stitch down the edge, keep a slight tug on the fabric to keep the edges together. Stop sewing at the center pin and with the needle down, remove the center pin. Grab the end of the strip and repeat the tug pulling and continue stitching until the pin pointing towards the foot reaches the edge of the foot. Put your finger on the ball end of the pin and hold it down as you are stitching. The pin will come out as you are sewing. I place my left hand on the other pin to keep the edges of the fabric touching my mole foam (1/4" seam aid). (I couldn't show my left hand holding the pin because it was holding the camera!) If there is any time that it looks like you might get a pleat, simply put your needle down, lift the pressure foot and pull the fabric straight back to straighten it out and then continue to sew. Press towards crescent shape.


This is what it will look like when done. No pleats and a smooth curve.


Now you can do this method with any kind of curves. The only change would be if the curve is a tighter curve like a drunkard's path block, you will need to make small clips with a scissors on the concave piece about 1/4" to 3/8" apart.

I hope this encourages you to try to do curves. They really aren't that hard.

Congratulations to the winners again. I will be contacting you soon. Please come back again soon as I will be having more of my own giveaways with some P&B fat quarter bundles.

As always: Do what you love and love what you do. Thanks for reading, Toby.

Friday, May 8, 2015

Friday - It’s my 100 Blocks Volume 11 blog tour day!

 
http://www.quiltmaker.com/blogs/quiltypleasures/


Hello everyone! I have been negligent about keeping up with my blog, but today I want to share a special giveaway and block with you. I have a block in the Quiltmaker's 100 Blocks Volume 11. It has been a while since I submitted a block to them (I have ones in Volumes 4, 5, and 6). They are having a wonderful blog tour with many of the talented quilters in the magazine and I get to be one of them!


Most quilters know that I love working with curves so I wanted to design something different with a curve. Pat Sloan had sent me her new fabric collection called The Sweet Life. Working on Electric Quilt 7 I came up with this block. As you can see it is simply made up of rectangles, squares, triangles and a simple curve. After you take my work shop on curved piecing you will see how simple it is!


Now it doesn't look like much as a single block. But when you put four blocks together you get this:


This is what it will look like in a quilt.
 

Now, I am never satisfied with my first version of a block so I had to play with it a little more. I decided to add a simple triangle in the corner.


Here is what it looks like, rotating the blocks in a group of four. 


If you combine the first and second blocks in a quilt you get this:


Now doesn't that look much more interesting!

The great thing about this blog is that I am giving away three prizes. I will pick two names to win a magazine. One that Quiltmaker will send you and one that I will send. I will pick a third name to win four fat quarters of Pat Sloan's, The Sweet Life batik collection. All you have to do is leave a comment on why you would like the magazine and if you think you would attempt to make my block at the end of this blog. What would you add to the block to create a secondary design?

To be in more drawings you should visit Quiltmaker's Quilty Pleasure Blog. You can go back to the beginning of the blog tour and check out the other blogs from the designers. If you are lucky enough to win a copy of the magazine, congratulations! If not you can purchase one here: Quiltmaker Quilt and Sew Shop.

Now to be in the drawing you have to leave a comment at the end of this blog. Tell me why you would like the magazine and if you think you would make my block. DON'T FORGET TO LEAVE AN EMAIL ADDRESS SO I CAN CONTACT YOU IF YOU WON. I can't tell you how many times I have drawn a name only to find out I can't contact them. So don't lose out. I do not share your email address with anyone.

Thanks for reading, good luck and as always: Do what you love and love what you do. Toby

Saturday, January 24, 2015

WINNER #5 AND FREEZER PAPER FOUNDATION TUTORIAL

Sometimes life just gets in the way. I try to keep up with all that I do (my husband is computer illiterate and can't help me with computer things). Sometimes I take on too many projects at one time! Since the beginning of the year I have designed new quilts, written patterns, traveled to a guild in Carbondale, Illinois and I am currently trying to finish making a quilt sample for RJR fabrics. I have to learn when to say no!

I had such a wonderful response to my Frosty pattern! I sent a copy to all who supplied me with contact information. If you are reading this and did not get a copy of the pattern, please send your contact information to info@gatewayquiltsnstuff.com so I can send one to you.

The winner of Monday's drawing is Mary Ellen Futch. Congrats Mary! I will send you the fabric bundle and my Geese on the Loose pattern.

I had said that I would post my method for foundation piecing in this blog. I love to paper piece (or foundation piece) because of the wonderful accuracy, but I don't like tearing off all of that paper when I am done. I have a friend, Dolores, who helps me piece quilts for magazines and I usually give her the foundation sections to piece because she is so quick. I was doing a pineapple block and when she was done, I didn't want to pay her to just tear paper off so I did it. It took me 10 hours to tear off all of the paper! After that I thought there had to be a better way. I'm not sure whether I came up with this method first, but I know I definitely like it better than the alternative!

What it involves is instead of using tracing paper or foundation paper, I use freezer paper. You can use the large rolls that you can purchase at the grocery store or you can purchase 8-1/2" x 11" sheets here: Freezer paper.tofrombuy=QuiltingSupplies||||1&p=2.


All of my patterns that have foundation piecing in them include a CD with tips for sewing plus the PDF of the foundation section so you can print it with your home printer. Here is what the quilt looks like. I designed this pattern for the Hoffman Challenge. It traveled with one of the groups and it has also won many ribbons. This is a popular workshop that I teach. 


Here is what the foundation section looks like, on one section, printed on the freezer paper.


I printed on the paper side (not shiny side). Also with all of my foundation patterns I have designed a set of acrylic templates to use either for traditional piecing or for foundation piecing. I like to use templates because I have very little waste when I sew and I like to use the correct shape for the section so that I don't make a mistake and sew a patch that either doesn't fill the space or is turned in a wrong direction. This is what the templates look like. I include a couple extra templates, which I will explain their use later in the blog. You can find the templates here: Geese on the Loose templates.


I use the small templates for cutting out the pieces for foundation piecing. Since the templates include the 1/4' seam allowance and I need slightly larger pieces for the foundation piecing, I use an Add-a-Quarter ruler to add an extra 1/4" around the entire template.

Start by cutting a strip 1/2" larger than the template and use an Add-a-quarter ruler to add an extra 1/4" around the template so I have enough fabric for the sections.

When using the freezer paper you do not have to sew on the paper. Here are the steps to using it.

Step 1: Press the first fabric wrong side of the fabric to the shiny side of the paper.


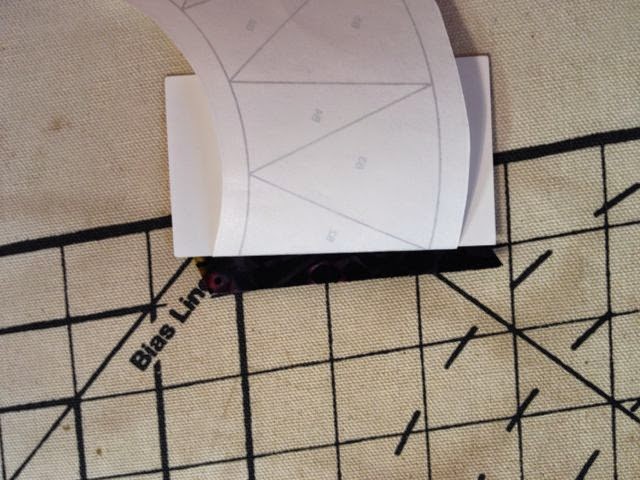
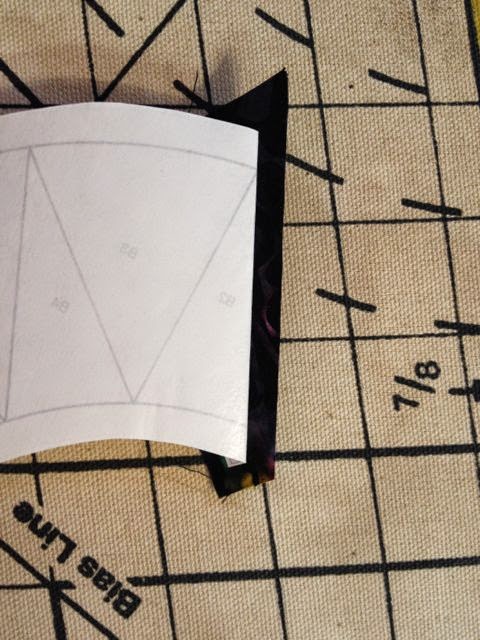
Step 2: Fold the paper back (I used my business card) on the line between #1 and #2. The line should show just next to the card.


Step 3: Trim the fabric to 1/4" using the Add-a-quarter ruler. 


Step 4: Place the second fabric, right sides together, lined up with the cut edge. Make sure there is a little fabric hanging over each edge and that the triangle is pointing in the direction that you see through the top of the paper.


Step 5: Sew ALONG the edge of the fold of the freezer paper, NOT on the paper.


Step 6: Finger press the fabric over and then press with an iron to the line between #2 and #3 sections.


Repeat steps 2 through 6 until you have the whole section finished.


My template sets have extra templates that are used to trim the section to the exact size you need to sew in the block. Peel the freezer paper off the pieced section and using the template, (place some rolled up tape on the back to keep it from sliding around) line it up on the points of the pieced section making sure that they are within the seam allowance. Trim around the template and your section is ready to sew!


Doesn't that look wonderful! No paper to tear off and the freezer paper is ready to go to make another section. I like to string piece 5 to 10 sections one right after the other as I sew on each section. That way they go together faster and I feel I have accomplished something when I get a group done!

I need to get back to awarding fabric bundles so here is the next fabric bundle from P&B that is up for grabs. It is another group from the Suede group. Please leave a comment as to what you think you might do with it. When I post the winner, I will show what I decided to do with it.


REMEMBER, I CAN NOT SEND YOU A MESSAGE IF YOU WON IF YOU DO NOT LEAVE YOUR EMAIL ADDRESS. DON'T MISS OUT. While you are leaving a message tell me what paper pieced pattern you have been wanting to do but have avoided because you didn't want to do all that work.

In closing; Always do what you love and love what you do. Toby Lischko