(Click on any of the red highlighted text for links)
Every day I am amazed at how many different versions there are of my design. Some I wish I had thought of myself! I have been rushed to get this quilt finished so I wish I had had more time to really work on some of the things I like to do, such as fussy-cutting. There have been some really fantastic versions with fussy-cutting in different parts of the blocks. Some have even added their own versions of the blocks by adding a pinwheel or other designs in the center of the blocks. That is what I love about quilting. There are no right or wrong ways to do something. You are only limited by your imagination! Of course if you are a beginner you will want to follow the directions to a "t" but if you are a veteran quilter, feel free to put in your own flair.
For this blog I will show you a couple ways to do mitered corners and how to make adjustments if your blocks don't fit your center. I hope that after you read it you will ask any questions and let me know if you have a problem that I have not addressed here. I can't answer comments at the end of the blog so be sure to ask them on the Facebook page.
One of the things that happened to me when I was getting ready to put the border on the quilt was the stripe fabric that I chose for the border only had 3 small stripes instead of 4 on the width of the fabric. Usually most border fabrics have 4 large and 4 small border stripes in them. I had cut 2 one yard cuts from the fabric to sell, so I decided to use that so I could get 4 stripes. The only problem was 1 yard wasn't enough to put on the edges of the quilt. So I had to do some creating sewing! Here is what I did and how you can piece a border strip when it isn't big enough.
Use two border stripe pieces cut to the same size. Press one edge of the stripe 1/4" towards the back.
Find the match of the same design that is on the edge of the fold to the second border stripe.
Place a small line of glue (I use Elmer's School Glue) along the fold and then press it with a hot iron to the second border where they match.
Fold back and trim seam to 1/4" (along cut edge of first strip). Sew along at the 1/4" fold. Your strip is now ready to be trimmed and sewn to the quilt.
MITERED BORDERS
When sewing on mitered borders it is important to measure the width and length of your quilt. It is best to measure the center of your quilt to determine the measurement. Sometimes the edges get stretched and it isn't always the best measurement.
IS YOUR QUILT SQUARE?
Before putting on any borders you need to determine if your quilt is square. That doesn't necessarily mean square as in the same on all sides but square in relation to the quilt being equal along the entire quilt. The best way to determine if your quilt top is square is to lay the quilt on a flat surface. Take the top and bottom edges and fold them into the center of the quilt. They should be the same measurement as the center. You need to do the same with the side borders. If they are not there are a couple things you can do.
First, if the outside edges are slightly bigger than the center you can trim them down a little on each edge. A second option is to take in some of the seams on the blocks slightly across the quilt. Try to take in some seams on the right, middle, and left so that they are taken in evenly. The third option is, add the 3 different measurements (top, middle, and bottom) and divide by 3. This will be the measurement that you will use to determine your borders. The third option is the best option if the center is bigger than the outside edges.
WHAT SIZE DO I CUT MY BORDERS?
The center of this quilt is 30-1/2" square. The border strip is 3-1/2" (that includes the seams) wide. To determine what size strip you need for a mitered border you use this formula. Size of quilt plus 2 times the size of the finished border plus 4 to 6 inches. So for this border I would cut 4 strips that are 40" to 42" (30" + 6" + 6").
SEWING THE BORDERS ON
This is my method. You can certainly use a method that you have used that works for you. This works best for me with large quilts.
Step 1. Match the center of the quilt and border strip. Fold one right sides together and the other wrong sides together. This will create a small crease and they will fit inside each other.
Step 2. Mark 1/4" seam on all four corners of the back of the quilt.
Step 3. Measure from the center of the quilt to one edge. For this quilt it would be 15-1/4". Using a measuring tape measure 15-1/4" from the center of the border strip and make a small mark. Repeat on both edges.
Step 4. Match marks on border to the edges of the quilt top. Pin with the border on the bottom so you can see the 1/4" marks on the back of the quilt. Don't be stingy with the pins. It works best when you lay the quilt on a flat surface to pin them together. Always pin halfway between each pin set to get the borders to piece evenly.
Step 5. Starting at the 1/4" mark, backstitch or use your sewing machines knot function (I love that function on my machine) and sew to the 1/4" mark on the end and backstitch or knot. Repeat with all four border strips.
Step 6. Lay the quilt on a flat surface where you can press with an iron. Lay out the top border piece straight and the right side border piece across the top of it at a 90 degree angle.
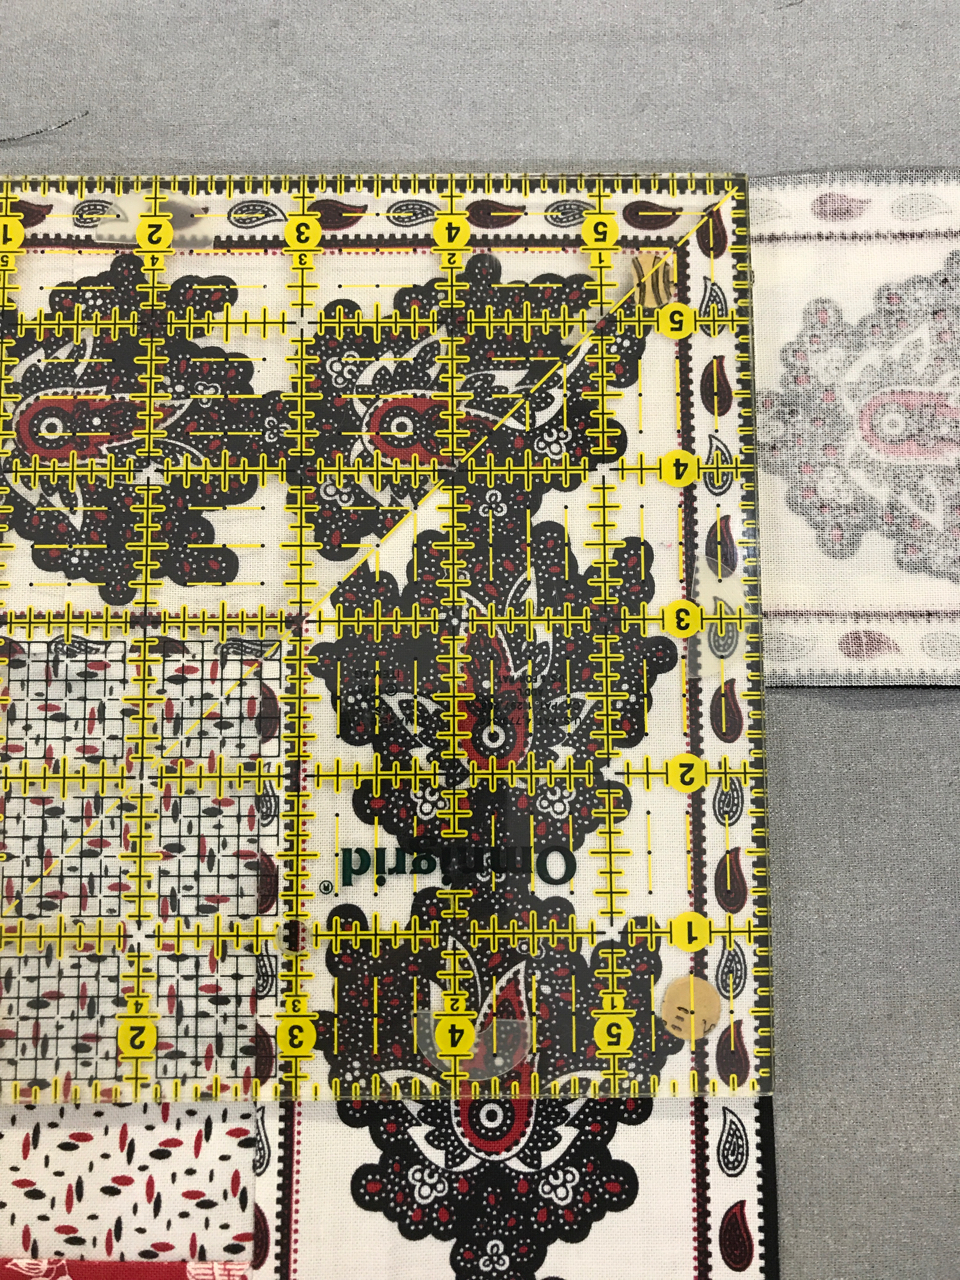
Step 7. Fold the top border under creating a 45 degree angle. The two strips will be evenly on top of each other with right sides together. Check with a square ruler, with a 45 degree line on it lined up with the fold, to see if the edges of the border are at a 90 degree angle. This first attempt was not quite right yet as the edges of the ruler did not cover the edges of the border. (Look closely at the bottom right of the photo.)
Slightly manipulate the corners until you get a good 90 degree angle with the ruler. (See how the edge of the border now is at the edge of the ruler on the bottom right.)
Step 8. Press corner with a hot iron. Carefully fold corner down and place a small line of glue along the edge of the fold. Fold corner back up and press again with a hot iron. Repeat on all 4 corners.
Step 9. Fold quilt in half diagonally and trim seam to 1/4". Now you are probably saying "Why didn't we just do this instead of all those other steps?" This certainly does work some of the time but I don't always know if I will end up with a 90 degree corner when I do just this step. You can fold the quilt in half diagonally, take a long ruler and draw a line through the border strips even with the fold of the quilt and use that as your stitching line.
Step 10. Sew the corner seams with a 1/4" seam, backstitching or knotting at the intersection where the seams come together. Make sure that you don't catch the seams from the borders in the stitch line. Press seams to one side or release the glue and press seams open. Trim dog ears off corner.
Here is what my top looks like with the mitered border. If I had had more time and more border stripe I would have worked harder at trying to get the corners to match. By some miracle one of them matched almost perfectly without me even trying!
I didn't have time to piece the rest of the quilt but did lay it out. I made a couple changes to my original design (designer's privilege)! I saw one of the settings in the Facebook posts that I liked and decided I didn't want to take the time to match all those triangle seams in Block 1! I also changed blocks 2 and 3. On block 3 I didn't have enough of the red fabric so I had to use a different one. On block 2 I decided to use the fabric I used in the center medallion because I have a design rule that I don't use a fabric just once in a quilt (just one of my own design rules). So here is what my quilt will look like. Now to finish piecing it and putting on the last two borders. Don't forget to measure again each time you put on your borders.
MAKING ADJUSTMENTS
Okay, now you are ready to sew the blocks to your quilt. You sew your four blocks together and they aren't the same size as your quilt top. With this new inner border your quilt now measures 36-1/2". The four 9" blocks sewn together should equal 36-1/2" and they don't! Don't fret. Is your measurement larger than 36-1/2"? Easy fix. Take in some of the seams just a fraction (I took them in a stitch width or just moved my needle to the left one click.) Is the measurement too small? Take out the seams just a little.
What if the center medallion is not 30-1/2" so when you sew your borders on they it will be too small? You have a couple options. First sew your four blocks together and measure them. If they equal the measurement of your center plus the 6" (don't forget your seam allowance of 1/2") then you don't need to do anything. Chances are all of your blocks will be slightly smaller so they should work out.
If your blocks sewn together equal 36-1/2" and your center medallion is too small then you need to make your borders slightly larger to equal the width of the blocks. There are always ways to make some type of adjustments to get things to fit together.
NEW DRAWING AND WINNERS
This week's winners are Jean Squires, Ann Fitzmorris, and Kathy Onarheim. They each won my 1/4" seam guide with a trimmer. Please send me your address so I can mail one to you. Congrats ladies. This week I will again choose 2 winners to win a pdf of any one of my patterns. This includes my international followers so don't forget to leave a message and your contact information. Good luck!
I still have some wonderful fabrics in my End of the Bolt sale so be sure to take a look. They are only $5 a yard for the remainder of the bolts. END OF BOLT SALE. I will be having a Black Friday sale next week so be sure to read my blog and find out about some fantastic deals!
NATIONAL QUILTER'S CIRCLE
National Quilter's Circle is offering a great special on their membership. For only $25 you can get a Gold membership and get free classes and free downloads for a year! Use this link to get the special price and please use this code "TOBY25" when checking out. I want to say that I do get a bonus if you use my code.
I will have a separate blog for block 4. As always, do what you love and love what you do. Thanks for reading and be sure to share with your quilting friends.